Showing posts with label Finished Quilt 2018. Show all posts

Monday, December 31, 2018

Finished Quilt!

It is so rewarding to have my last blog post of 2018 be about a finished quilt! This is "En Provence" which was the Quiltville mystery that started in November 2016.

En Provence

The quilt top was finished in February 2017 which was record time for me (less than 4 months). Then it sat in the UFO closet until it was aged for the perfect amount of time, which was a total of 20 months. In November I got "a bee in my bonnet" and really wanted to finish this quilt before the next Quiltville mystery started. 


The machine quilting took many hours over November and December and it was a joy to work on. The quilt measures 70" square and it was easy to manage the quilting on my domestic sewing machine, so I am encouraged to tackle some of my larger quilts this year.

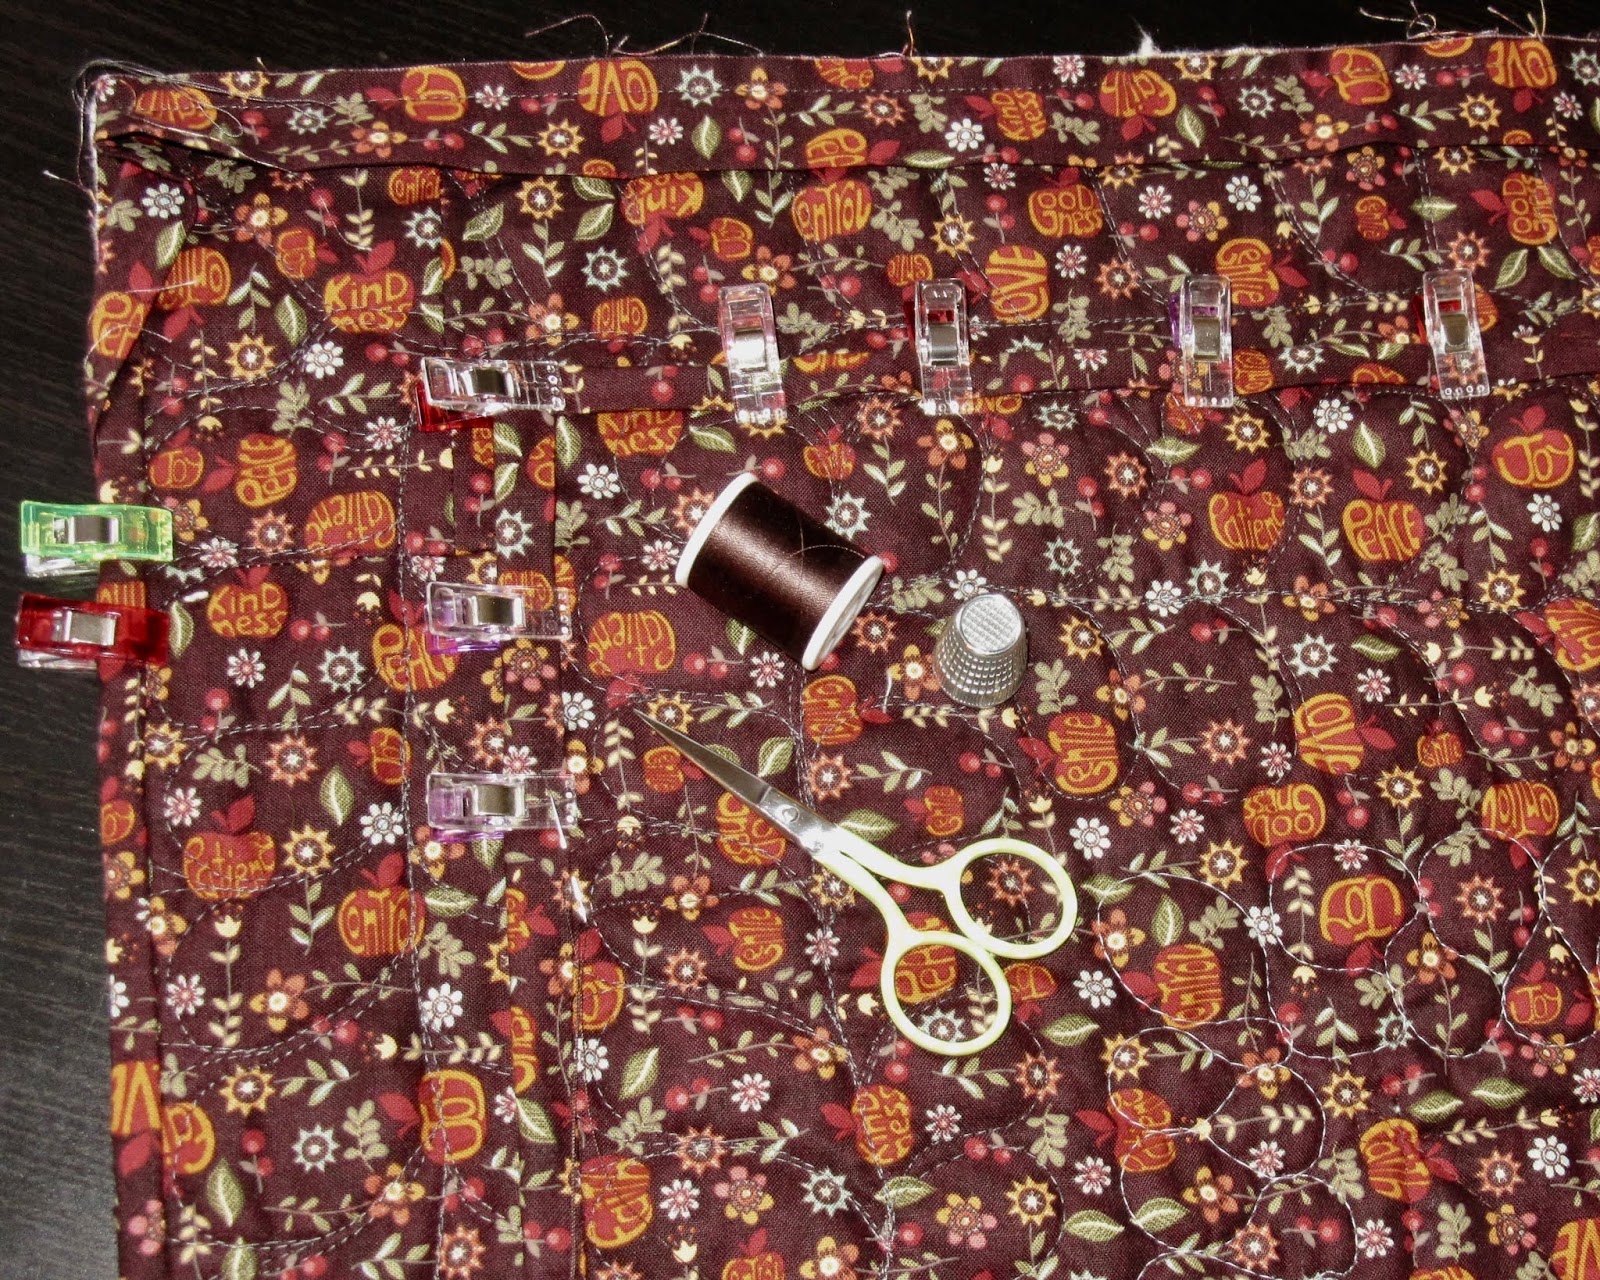
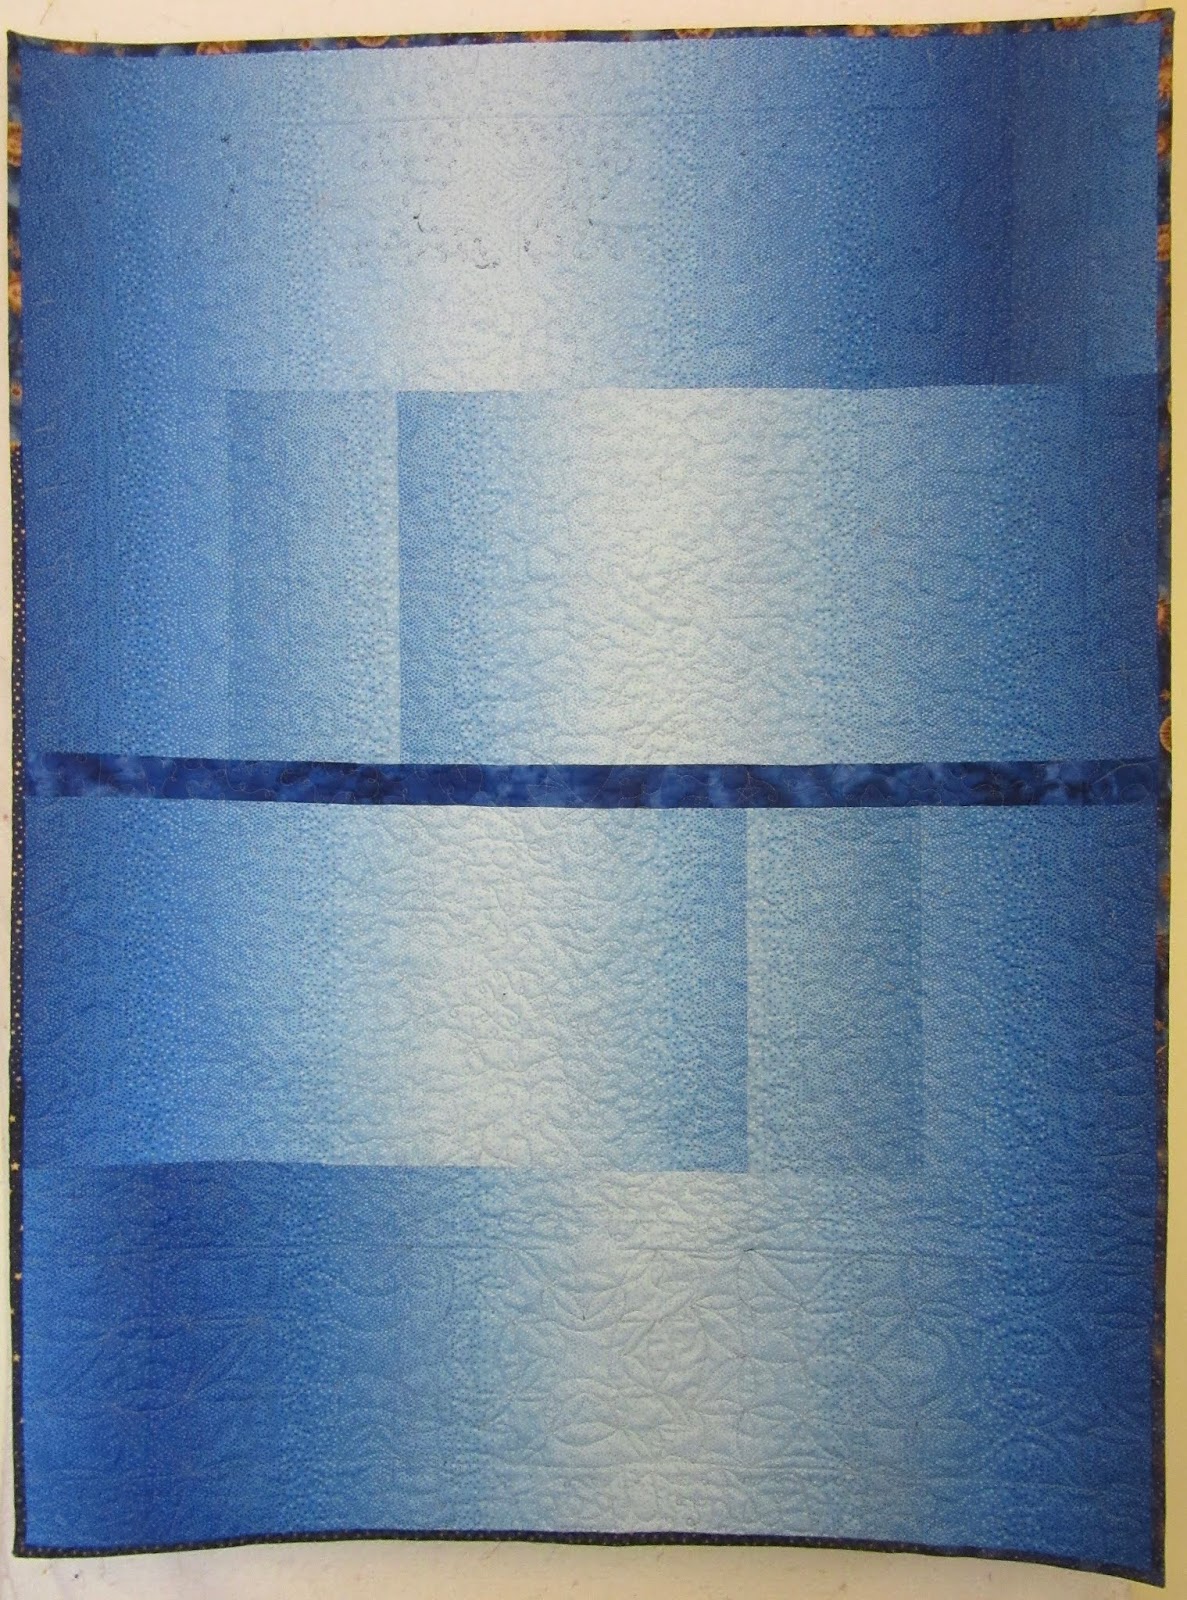
This is what the quilting design looks like on the back of the quilt. I love this fabric which is from the "Good Neighbors" line by Amanda Jean Nyberg.


For the photo shoot I clipped the quilt to the fence during a rare moment when the sun was almost shining. This is the back of the quilt with the "Good Neighbors" yardage in the centre and leftover blocks and scraps on both sides. Looking at the photos I realize I forgot to put on a label. Again. I will sew one on "tomorrow".
It sure feels great to have a finished quilt on the last day of 2018!
I'm linking up to One Monthly Goal finishing party, and Design Wall Monday over at Judy's. 

Thursday, December 27, 2018

Paper Pieced Christmas Gift

Paper piecing is one of my favourite techniques, but I don't do it as often as I would like. It feels like a special treat to set aside time to work on a paper pieced project. I gave this treat to myself with a pattern I purchased from Paper Panache. Linda Worland is a master designer and I have been sewing her wonderful Paper Panache patterns for about as long as I have been blogging, which is 13 years!!


I decided to make Linda's Sisyphus pattern for a special friend for Christmas. Do you know the story of Sisyphus? There are different versions of what this greek myth means, but what it represents to me is...
whatever your job/life/situation is, you must continue to be persistent, try your hardest even when the situation is meaningless or hopeless, never give up, and be thankful for the journey/challenge/opportunity. It's all about effort and mindfulness, not accomplishment.

I was thinking about this the whole time I was sewing Sisyphus because this project was a real challenge! These pieces are very small. Look at the size of them compared to the sewing machine foot. Some of the pieces are so small that a number can't even fit in the space!
There are so many things to think about when paper piecing, with the odd reverse angles, and trimming the excess fabrics without cutting the pattern. I had all the components pieced and took them to the cutting mat to trim the edges and accidentally put down 2 pieces at the same time, trimming the top unit correctly and then having a fit when I saw the smaller one hiding underneath.
I'm telling you, I just couldn't believe it! The way that the 2nd unit was accidentally cut meant that there was no seam allowance on one side. The irony of wrecking this project just when I was ready to sew the whole thing together was not lost on me! 
I am the quilty version of Sisyphus!
I had to "go back down the hill" and think long and hard about how to roll the rock up the hill again. 
wrong one on the left - new version on the right
There must be a way fix that unit. Maybe add a blue strip on the edge? No that separated the body from the legs!
After trying a couple of ideas, I decided it was not reparable and I had to reprint the pattern and make a whole new section C. But I was running short on the background blue fabric and had to add in another dark blue, which wasn't too big of a challenge for a scrappy quilter.
And since I had to redo the whole unit, Sisyphus also got a wardrobe change after I decided that the first plaid did not have enough contrast with the blue background.

I did a little bit of machine quilting that you probably can't see in the photos. "Sisyphus" is quilted in the blue area, and "Never give up" in the brown area. I didn't pre-draw the design, just free motion quilted whatever came to my mind and filled in the spaces with straight, curved, or wavy lines.
Here is the completed mini quilt. It finished at about 10" square. The binding is made from 2 plaids since there was not enough of either one to go all the way around. The wonky plaid binding makes it appear as if the quilt edges are not straight, which at first was really annoying me. But now I think that's par for the course with Sisyphus. What a struggle it was... as if the creative process had to mimic the myth! 

Friday, October 12, 2018

Two Finished Mini Quilts

I finished up two Temecula mini quilt projects this week. If you remember from Monday's post, there were 15 blocks that were the same size and 11 blocks that were voted off the project. 
Here are the 15 blocks joined together with vertical sashing. I didn't want to quilt through the colonial ladies' heads, so went with simple vertical lines. Then I decided it needed just a bit more quilting, so I stitched around each of the 1.5" blocks. That meant 15 stops and starts, which isn't "fun" quilting, but it was worth it as the extra quilting did make the quilt look a bit nicer.


I took the quilts out for a glamour photo shoot with the lovely fall mums that are planted downtown. The photos didn't turn out as well as I had envisioned, but you get the gist!

Finished size: 16.75" x 21.5"


This little cutie was made from the deconstructed 25 patch blocks (that turned out to be too small), and the first 2 blocks that I made incorrectly. These imperfect blocks fit perfectly together!

Finished size: 6" x 12"


And while we're talking about Temecula Quilt projects, they are starting a new sewalong next week! It's called Secret Santa Sewalong and I can't wait until next Friday!

Wednesday, September 05, 2018

Quick Small Finish


Helen's tablerunner kit  provided some wonderful instant gratification and I finished it in record time! It was fun to quilt concentric lines radiating from the centre of the courthouse step blocks. Since I used a free motion foot for the quilting, I could easily stitch in any direction (feed dogs dropped, stitch length on zero). I used a hera marker to mark some lines to stitch on, which  helps me to make those longer lines a little bit straighter.


All of the fabric for this project was from the kit, except the backing which came from the gift box I received from Helen's family. I plan to gift this to Helen's son and family at Christmas. I am also planning to sew a baby quilt to give to Helen's granddaughter (baby due in February) made from her fabrics. 

This photo was taken in my friend's garden on the day I finished the binding. It was a lovely afternoon of outdoor hand stitching!
Linking up to Sew Fresh Quilts.

Friday, August 31, 2018

Finished Quilt!


It's such a great feeling to finish a quilt!


This was a "pinch hitter" for my originally designated UFO of the month. I am delighted to have this one finished, although I am still looking for the original project of the month. 
This quilt was started at the 2017 Superbowl party, so that's about a year and a half from start to finish, which is a pretty quick turnaround time for me!


I used several different quilting designs on this quilt and you can read more about the machine quilting here. I'm happy that the curvy diagonal lines can be seen in this photo!


The quilt pattern is by Kris Driessen of QuiltBug and was for a square quilt. I added two more rows, and sashing to make it a lap quilt and the finished size is 47" x 63.5".
The border, binding and backing were all made from  this fabric. 
This quilt is being donated to Victoria's Quilts, a Canadian organization providing comfort quilts to cancer patients
This quilt isn't the right size for Victoria's Quilts, so it is being donated to the comfort quilt collection at my local guild.

Saturday, June 30, 2018

Another finish!

attaching binding strips
It's always exciting to announce a finished quilt, but when it's the second finish in a week, AND when the finish actually meets the goal you set for yourself, well that's just a great day! My UFO for the month of June was my Broken Dishes quilt, made from red reproduction blocks received almost 2 years ago in one of Barb Vedder's block swaps

back of quilt showing quilting design


The blocks were sewn into a quilt top at winter retreat last year using a layout from Hyacinth Quilt Designs
The quilt was machine quilted over the past month using a combination of free motion curves and straight lines. More info can be seen here and hereThe binding took 4 evenings to stitch down and the quilt was finished on the very last day of June. Finished size is 48" square.


Here is the clothesline shot of "Red Repro Broken Dishes"...

To see more UFO finishes this month, hop over to the link up at One Monthly Goal.

Thursday, June 28, 2018

Mini Quilt Finish

Part #1 was posted yesterday describing how I took some quilt block trimmings/garbage and turned them into little "tent" units.  
This is part #2 of the finishing of the mini quilt.


The scrappy diamond blocks were sewn together randomly and because it's a mini quilt the quilting was really quick and easy...7 lines of "stitch-in-the-ditch (vertically and horizontally).


I cut the 1.5" binding strips from a 10" square of a chocolate bar print fabric and needed 5 strips to go around the quilt. The label is a 4" square folded in half and tucked into the bottom corner on the back of the quilt. I hand stitch the diagonal edge of the label and then sew the binding down on top of the sides of the label.


The finished size of "Diamonds in the Rough" is 9.75" x 10.75" (about the size of a wine glass) .

And now for the photo shoot...


Diamonds in the flower garden


Diamonds by Trout Creek

(it was windy so it could have been "Diamonds up the Creek" at any minute!


Diamonds in the field of wild lupins

(no snakes or other wild creatures were encountered during walk into field)

Isn't it interesting how the pink background fabric looks slightly different in each photo depending on the lighting and the colours around it!?!
So there you have it... a little improv quilt made from scraps.

Saturday, May 26, 2018

Rainbow Scrap Challenge Finish!

Can you believe I am posting my SECOND quilt finish this week?!?! So exciting! I finished my quilt for the "Wish Upon a Star" blog hop (see it here) and I also just finished "Tied Up In Knots"! This one is a really big finish for me because I've been working on it for 6 years!

The first block was made in January 2012 as a Rainbow Scrap Challenge project. I meticulously cut the 1.5" scrap  squares in the colour of the month for a total of 56 squares per block.  The 12" Knot block pattern is by Tina Curran and was published in issue #3 of Quiltmaker's 100 Blocks magazine. 
Finished size: 43.5" x 57.25"


Spring has finally arrived here and the outside world is turning green at last!  When the binding was finished I went for a walk with my sister looking for some photo op locations. This is a fun shot because the first block I made for this quilt was the red one.


It's not very often I get a fancy photo of me with one of my quilts! I'm very proud of this multi-year effort, from the graduated arrangements of the colours within each block, to the challenge of machine quilting the blocks and the diamonds in the sashing, this finish has been a long time coming! 


Thanks to Angela for hosting the weekly Rainbow Scrap Challenge and to all my blog readers for the encouragement to stick with this thing over the years. And thanks for celebrating today with me! So pleased to be posting this finish over at the RSC weekly link up.

Thursday, May 24, 2018

Wish Upon A Star Quilt

It's my day to post my star quilt for the blog hop. Thank you for dropping by! My project is made of orphan blocks from 3 different block swaps from many years ago. The blocks were sitting in a project box in the UFO closet until Carol suggested making something with a star on it. Hey... I have some stars in the closet! 
"Make a Wish"

The top star blocks are 6", the middle nine blocks are 12" and the bottom stars are 9". It was a challenge to figure out how to combine 3 different block sizes, and along the way there were a few creative possibilities using layouts that made the quilt way too big. I wanted to make a donation sized quilt, so this layout came out to the right size at 45" x 60".

quilting on a 12" star block

All the free motion quilting was done on my Brother 1500 domestic sewing machine. The quilting design is mostly loops and stars, with some curved arcs in some of the star blocks. 


Pinocchio inspiration


Around the outside border I quilted the lyrics from the song  "When you wish upon a star(which won the 1940 Academy Award for best original song) from the Disney movie called Pinocchio

"When you wish upon a star
Makes no difference who you are
Anything your heart desires
Will come to you"


Beginning border quilting
This song just makes me feel happy, and I played it on Spotify repeat until the border quilting was done! I even found the kids' old Pinocchio video to take a photo of with the finished quilt!


quilt back

I'm so happy that these blocks have finally become a finished quilt. Not a single fabric was purchased for the quilt top and the binding strips were leftover pieces in the navy scrap box.
Here is a photo of the back of the quilt. It used up 5 pieces of fabric that were in a bundle on sale for $10 at Creative SistersThat's a great deal for a backing! 
Hopefully you had some time to visit the other blogs on the hop and enjoy the wonderful star quilts that have been created (complete list here).  
Here are the other blogs to visit today:
May 24

Thanks to Carol for organizing another fun blog hop for us to enjoy!

Friday, March 23, 2018

Finished Quilt!

Sewing Ringo Lake blocks on Lucy (long bed) my 1953 Singer 301
On Wednesday Bonnie Hunter hosted a QuiltCam session and I was so happy to be able to play hooky and catch most of the session. And not only that, Bonnie posted a photo on her blog that I took of my sewing table during QuiltCam while I was sewing some Ringo Lake blocks - click here to see it! 
Bonnie raised the interesting topic of how to manage social media and still have enough time to actually quilt. I know many people struggle with information and communication management, but I can thankfully say that I don't. In spite of constant pressure from many of my peers/friends/relatives, I do not have Facebook, Instagram, Pinterest, Tumblr, or Twitter accounts. I only have email and a blog account in order to keep track of the things I am creating. 


These days in my free time, I am only focused on what brings me joy, because life is hard and my job is usually very hard, and I won't survive it if I am not extremely careful with my time. I decided that in the second half of my life I want to only focus on being with people who make me ridiculously happy, and doing things that bring me joy as much as is possible.  "Joy is medicine"!


And because quilting brings me joy, and I spend as much time as possible doing it, I have a finished quilt to share!
Here is the 2018 Super Bowl mystery quilt which was called "Three Cheers for the Red, White and Blue". It is a perfect baby quilt, with train themed fabrics and measuring 42" square.


The quilting is straight diagonal lines done in red and blue threads using the walking foot. It went so smoothly and so quickly that I could hardly believe when it was ready for the binding!


Since my Dad is a train fanatic, this will make a perfect quilt for his great grandchild, so I'm going to put this quilt in the storage closet (which is a difference place than the UFO cupboard!) until that day finally arrives.
Linking up to Finish It Up Friday!

Wednesday, March 07, 2018

Small, Smaller, Smallest Blog Hop

Welcome to the blog hop celebrating small projects. I adore miniature quilts and working with tiny pieces. One of my favourite patterns is Omigosh by Sue Garman. I have been making a colour block version of this quilt for a few years.

For this special blog hop I decided to use only the double nine patch blocks from the Omigosh pattern. These blocks are made from 1" squares, which finish at .5" when sewn into the quilt.

Here it is laying on the floor in the kitchen...

Quilt statistics: there are 1,845 tiny 1" squares in this quilt and it measures 49.5" square.
I learned that it is hard to photograph a quilt with so much white in it and still be able to see the quilting. I quilted a diagonal grid using coloured threads in the double nine patch blocks and white thread through the white alternate squares. 
I eyeballed the double 9 patch stitching, but marked the line to stitch across the open white squares using a hera marker. It doesn't leave any residue on the quilt but just makes a slight indentation in the fabric to follow. I marked each line as I came to it... mark, quilt, mark, quilt, etc.


Here is the fun label that I made for the back corner using up a few more 1" squares. My quilty friends decided it should be called "Scrap Rescue 911".


Thank you to Carol for organizing this wonderful blog hop experience! And as a thank you to YOU the blog readers, I have made 2 small mug mats to giveaway. Leave a comment below and your name will go in the draw to win one of these tiny double 9 patch miniature quilts. Mr. Max is so sweetly displaying what you can win! Just look at how he has his paws crossed... OMG I love that furry guy (except when he is a quilt eater!)

There is the list of miniature quilt makers who have made special small projects to share with you today:

March 7

Kathy’s Quilts (that's me!)


Wednesday, February 28, 2018

Finished Quilt

It's always fun to announce a finished quilt. This is a relatively new UFO, but it was demanding to be finished and I had everything needed for the finishing including leftovers to piece a backing and binding, so it butted to the front of the UFO line. 
This pattern is called "Scrappy Friends" and was the New Years Day mystery quilt hosted by Quiltbug. The finished size is 45.5" x 65.5" which is a perfect size to donate to the comfort quilt program at my guild. I'm hoping someone will enjoy this quilt for years to come.

All the quilting was straight lines on the diagonal using the walking foot. The binding was finished while watching the olympics at quilt retreat.
Woohoo! Another project moves from the UFO closet to the done pile!


To see more finished UFOs, hop over to the One Monthly Goal link up.

Tuesday, January 30, 2018

January UFO Completed

So excited to show my first finished quilt for 2018! It's amazing to me that I was able to finish the quilt in January considering I was sick for half of the month.
This is my variation of the Magnolia mystery quilt hosted by Cheryl who blogs at Meadow Mist Designs. The project kicked off in July last year and the final step was posted in December. My Magnolia quilt is an octagon shape and measures 39" across.


The quilting was done on my regular sewing machine and is a swirly free motion design. The binding fabric and most of the backing is from the "Mama Said Sew" fabric line by Sweetwater.
Thanks to Cheryl for a fun mystery quilt! There will be a mystery quilt parade sometime in February and I'll post the link when it's parade time. It's always fun to see the many unique variations of one pattern.
Linking up to One Monthly Goal January Finishes, where Patty is showing her finished Magnolia quilt!