Monday, August 31, 2020

August UFO

August was a very full month, so I am very delighted to be able to post my UFO project! This is my version of the Moda Blockheads II. This sampler project started in June 2018 with a bundle of Sweetwater Harmony fabrics.


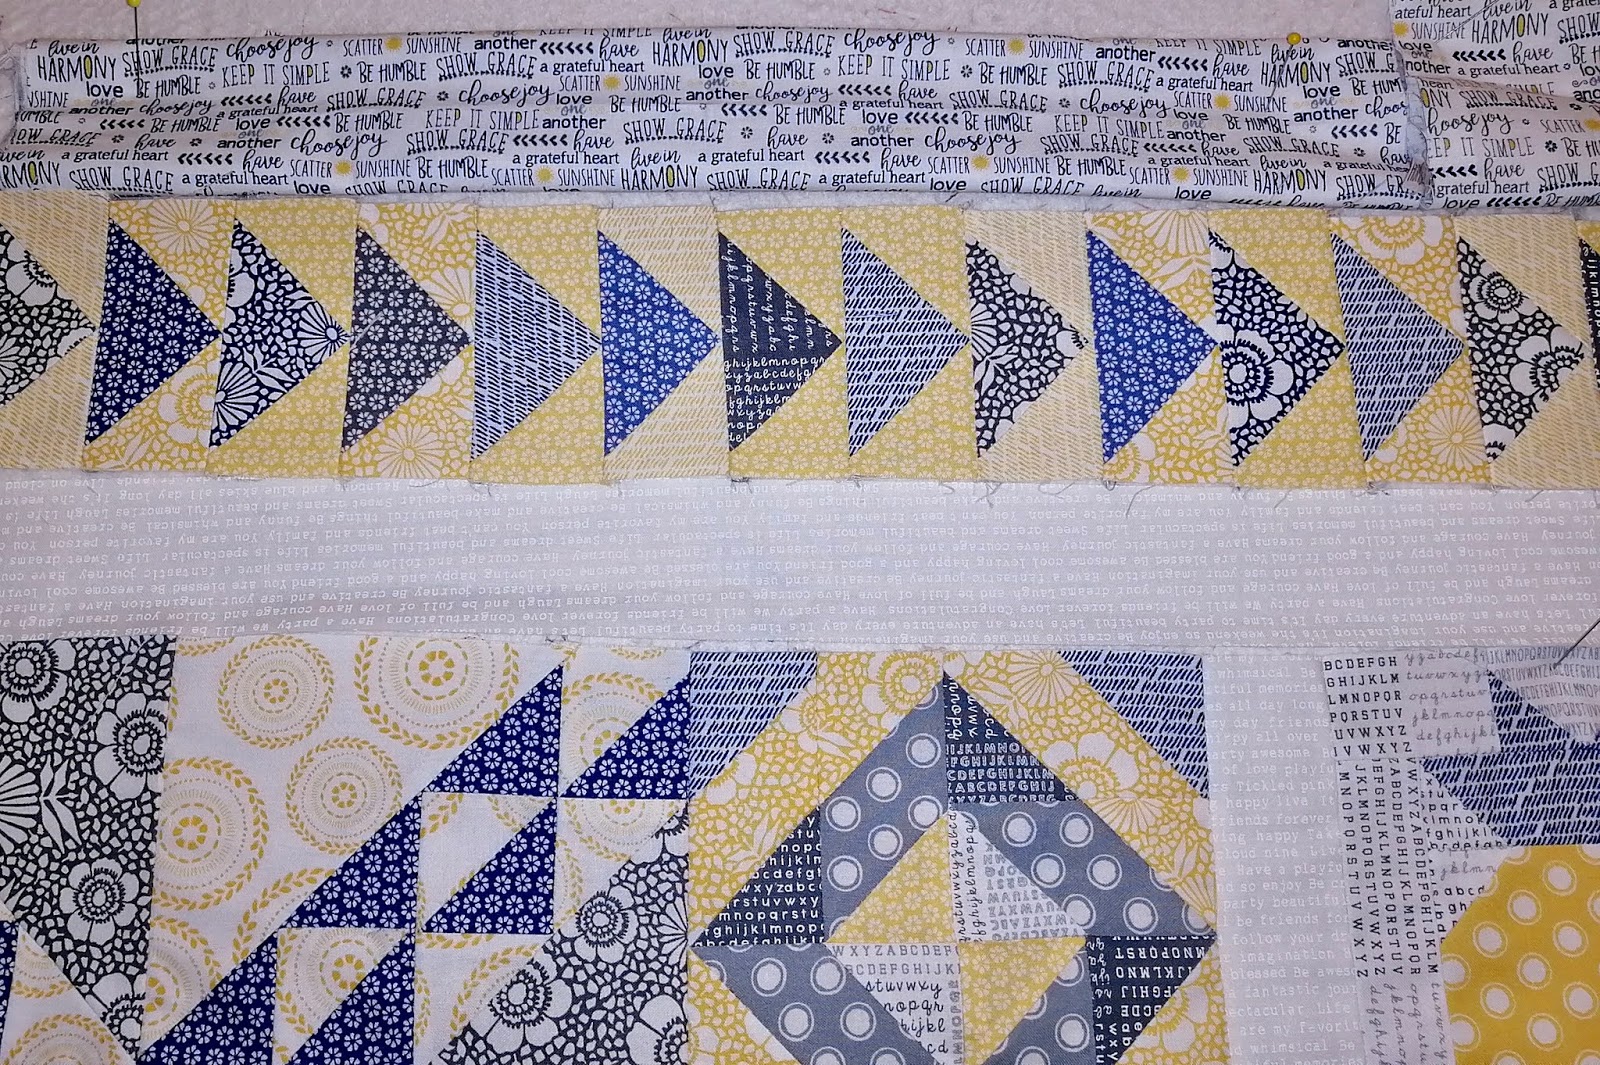
I attached the flying geese rows to fly in opposite directions on the recommendation of many of my blog readers and I think it was a great idea! I love how it turned out and look forward to quilting it and finishing with a light blue binding.

borders
Here is a close up of the borders which shows the true colours. The top border print is heavily pieced with scraps, and there was just enough to do a 2" border on the top and bottom. 
The quilt top size is 49" x 56.5". 
Linking to One Monthly Goal and Design Wall Monday over at Small Quilts

Sunday, August 30, 2020

Slow Sunday Stitching

Welcome to Slow Sunday Stitching!


We meet here every Sunday to celebrate the art of all varieties of hand stitching. If it involves a needle (or 2), and thread/yarn, and stitching taken with your hands, we want to know about it! 

Here's a little finish that I am proud of - my first knitted dishcloth. 
There are so many issues with this thing, from the uneven cast on (while I tried to remember how to do that!) to the wonky edges, it's not my best work. But you can see the whale pattern and I really enjoyed making it so that's what matters. 
Thank you for all the helpful ideas in the comments on last Sunday's post for ways to deal with knots in the yarn.


I've already cast on the stitches (more evenly this time) and have started another cloth. I'm using straight needles this time to make it a little easier for myself since that's how I learned to knit. I'm enjoying this Sudz yarn which is specifically for making dishcloths. 


Today I will be hand stitching the binding for my August mini quilt. You can see how I stitch the split hanging sleeve right into the top binding.


Hand Stretching Exercise
I'll end today's post with a hand stretching exercise from Becky Goldsmith. Show some kindness to your hands and treat them to a little stretch!

Link up your blog post below and share your hand stitching project with us.
You are invited to the Inlinkz link party!
Click here to enter

Saturday, August 29, 2020

Wishing Rings

Two RSC posts on one day...that is rare, but that's what happened this week!

9 lavender wishing rings
While I was looking for scraps for the lavender log cabin blocks last week, I pulled out enough 1.5" scraps to make 9 more wishing ring blocks. I have been making 9 of each colour and sewing them together.


Here is the block collection on the design wall.
90 wishing rings

Linking up to Rainbow Scrap Challenge

Scrappy Saturday - Mini Arrowhead


One of my favourite ongoing RSC project is the mini arrowhead blocks that finish at 3". I have been working on these since the summer of 2018 and make a few each month as I feel inspired.

It starts with cutting out 4.25" squares, and then cutting the squares into other shapes according to Anita Grossman Solomon's instructions. Here is the stack of cut purple blocks ready to sew throughout the month of August. I keep them in a baggie by the machine and sew a block or two when I have a few moments.


Here are the purple blocks sewn. I very rarely buy purple fabric, so these are all scraps that other quilters have given to me.


Here are all the purple blocks from last year and this month. I still super love this project and feel lots of energy to continue making more blocks. There are over 100 blocks in the collection so far, but they measure only 3", so that makes a wallhanging size and I'd like it to be a bigger quilt.
Linking up to Rainbow Scrap Challenge

Wednesday, August 26, 2020

Miniature Sewing

Every month my goal is to make a mini quilt with the quilters who post monthly at The Constant Quilter. It's always a challenge to see if it can be finished by the end of the month. 

mini quilt layout
The August mini started with about 50 little 4 patch blocks using up 1" scraps. Then I added the alternate neutral blocks and decided the quilt would be as big as the number of neutral 1.5" squares would allow. I like to use the wool pressing mat to layout mini projects as it keeps the pieces stable.

I keep the pressing mat right beside the sewing machine and start sewing from one side. There is a pin in every block on the right to make sure the row stays the right way up. 

I pick up sections to sew together and feed them through the sewing machine, one after the other until all the rows are completed. If I get the top together today, I might just have enough time to finish the quilting and binding by the end of the month and meet my goal!

For some quilty inspiration, hop over to Wendy's blog to see the amazing quarantine quilt she made called "Community Supper". It's a masterpiece... and I'm not just saying that because one of my blocks is part of her quilt!

Monday, August 24, 2020

Design Wall Monday

The August UFO project is on the design wall today. Two rows of flying geese were made to extend the length of the quilt. Should there be a white sashing between the centre blocks and the geese? You can see at the top there is the white strip between and at the bottom there is no strip. Which do you think looks better - the top or the bottom? 


Here is a close up of the flying geese at the top and the border print that I want to use. 
I love this Sweetwater text print. There isn't much of it left and it will need to be pieced together, but I think it will be a good top and bottom border.
Linking up to Small Quilts

Sunday, August 23, 2020

Slow Sunday Stitching

Welcome to the weekly link up for hand stitchers! 
Make yourself a cup of your favourite beverage and visit the links below for some creative inspiration. You just never know what you will be tempted to make when you see what your fellow creatives are up to!

For example, I saw on The Cozy Quilter blog a knitted dishcloth that would be a perfect gift to make for Christmas. I have done a bit of knitting here and there over the years, but I learned to knit as a child and that was a long long time ago!  So I reviewed the pattern with some trepidation and wondered if I had enough concentration ability during covid to tackle such a task? 

Drop it Max!
I gathered up the necessary supplies from my local knitting shop where they were very helpful and encouraging. I studied everything for a few days and had to keep an eye on Max the granddog because he was really admiring that ball of yarn too.

Eventually I was brave enough to start! So far, so good with the challenge of using circular needles AND following a pattern where every line of knitting is different.  


a knot in the yarn?!?
Here is a question for the experienced knitters in the group... what do you do when you come to a knot in the yarn? I wasn't sure how to handle that as I've never had that happen before in my knitting adventures.

And you know how I love making miniature quilts? I sure hope I don't start to go down the rabbit hole of micro knitting... just look at the amazing work of Althea Crome. WOW!

What are you hand stitching today? We love to see your slow progress and cheer you on!


You are invited to the Inlinkz link party!

Click here to enter

Saturday, August 22, 2020

Scrappy Saturday

Earlier in the month I made a purple log cabin loony block and Mari suggested adding a lavender block to the collection. I wasn't sure I could find enough light scraps to make a block, but since these blocks only need 1" strips, I managed to scrounge up enough.


And I found a strip of lavender dots on white which was perfect for the background.  This is the only block so far that has 1 background fabric. So pretty!


Here is the collection of blocks on the design wall. I have tried other layouts, but I really love this offset with the vertical background zigzag effect.
Linking up to the Rainbow Scrap Challenge and Oh Scrap!

Monday, August 17, 2020

August UFO on the design wall

Some progress is being made on my UFO of the month.  The enthusiasm for making more blocks for this Moda Blockheads II project was completely gone, so I decided to just finish this quilt with the blocks I had already made. 

To make the layout work out, I had to remove 2 blocks, so the fish and the windmill were moved to the back of the quilt. Then I played with various layout combinations and decided to sew it together in sections with some white sashing to calm it down a bit.. 

Tada! The blocks are sewn together and I like it! But the size is 45.5" x 44" which is an odd size. I can't decide if this is a wallhanging or a lap quilt... should I make it longer to be more rectangular shaped? Make some pieced borders?


Moda Blockheads II

Sunday, August 16, 2020

Slow Sunday Stitching

Hello stitcher! Welcome to the weekly hand stitching party where we hope you will get lots of inspiration and encouragement to help you on your stitching journey.

I had such a relaxing time earlier in the week hand stitching the binding on my newly finished Shoo Fly quilt. I love this happy colourful looking quilt and the scrappy binding really finished it perfectly if I do say so myself!


Once that quilt was finished, I pulled out my embroidery project to finish up. There wasn't much left to stitch, so that was wonderful to have 2 finished projects in a short period of time!


I put the 3 finished tea towels on the clothesline for a photo. 


And then I went right back inside and worked on transferring the embroidery pattern for the next Stitcher's Revolution towel. FUN!

What are you hand stitching today? Do you have any finishes or slow progress to share with us? 


You are invited to the Inlinkz link party!

Click here to enter

Saturday, August 15, 2020

Scrappy Saturday - Easy Breezy

Now that I have finished last year's Shoo Fly leader-ender challenge, I am really enjoying the new Quiltville challenge block which is called "easy breezy"
Purple easy breezy blocks
I enjoy sorting through scraps and cutting them into block kits. I really do use the pieces as leader-enders were intended to be used, sewing them together in between other sewing projects. It's a great method that saves thread and allows me to sew another project with little effort.


I cut up the scraps and then pull out the monthly RSC colour to sew  each month. Here are the purple blocks from this month with the blue blocks from last month.


You know you are a true scrap quilter when you come across a little treasure, and it makes you feel so happy! Just look at this little boy on a piece of toile. Do you see the tiny little dog at his feet. So sweet! I have no idea where it came from but I just love it and had to sew him into a green block.

Linking up to RSC

Wednesday, August 12, 2020

Finished Shoo Fly!

It's been a while since I finished a larger (not miniature) quilt and in this crazy pandemic life, it's a miracle that anything quilting gets accomplished!

Finished Shoo Fly!
I'm just so happy with how this quilt turned out! This is my favourite kind of quilt - made slowly over time with lots of scraps of all the colours, and full of memories 💜

This quilt started with the 2019 Quiltville leader-ender challenge. I sewed a few bocks every month from scraps on my cutting table, and from the scraps donated by my friends.


machine quilted loops

I am slightly annoyed by the random direction of the loops. I wanted it to be consistent, but my quilting brain couldn't concentrate enough to make it happen. So now I am saying "I meant to do it this way"! Also, I wasn't sure if it was finished or not as the centre of the blocks are kind of puffy. But it really grew on me and I decided not to add any more quilting to it.


quilt backing


The backing is just a plain grey piece of yardage and I like how the quilting design looks on the back of the quilt.

Size of quilt: 51" x 71"


binding scraps
I also love the random pieces that I was able to use up from the leftover binding scraps basket. I wasn't sure what colour the binding was going to be, but there were a lot of turquoise/aqua/green strips so that's what it became.
Linking up to Finished (or not) Friday!

Monday, August 10, 2020

Design Wall Monday

step #5


On the design wall is the summer mystery quilt that my local quilt guild is doing online. It's a project to encourage quilters to keep sewing through the long covid summer. I am using up some older, less loved stash to make a donation quilt.


The blue/purple border and most of the star points were from a bag of block trimmings from a quilt my friend Marj was making back in February. This was the perfect project to use up these colourful scraps.

step #6

This is the most recent step of the mystery. I used up every bit of that black border fabric with about 1/4" to spare! There are 2 more steps in this mystery project and I'm intrigued about what we will be adding next.

Linking up to Small Quilts

Sunday, August 09, 2020

Slow Sunday Stitching

Welcome to the weekly link up that celebrates all types of hand stitching! 
Do you enjoy applique, hand quilting, knitting, embroidery, EPP, crochet, rug making or beading? Or do you enjoy some kind of hand stitching that we have never heard of?!? If so, we are your tribe! Come join us! We hope you will visit the links below and sprinkle positive comments everywhere you visit because we all need a little more encouragement these days.

I am so close to finishing my 3rd "Stitcher's Revolution" tea towel. I worked on it a bit this week and hope to finish it today. A thunderstorm is predicted, and I'm looking forward to it because that is one of my favourite things to enjoy hand stitching during a summer rain.


What are you looking forward to hand stitching today? Link up your blog post below and share your progress with us. 


You are invited to the Inlinkz link party!

Click here to enter

Saturday, August 08, 2020

Scrappy Saturday - Log Cabin Loonies

It has been a while since I worked on my Rainbow Log Cabin Loony project and this week I decided to add a purple block. The block is made from 1" strips and is made by joining 4 log cabin blocks. There are 52  pieces in this 8" block. 


This project has been in progress for about 2 years and was inspired by Julie's Log Cabin Loonies group. Her block cutting instructions are still posted here. It is time consuming to cut out all the little pieces, but then it is really fun sewing them together. (The pieces on the left of the photo are squares that will be sewn into waffle blocks).


The new purple block joins the other 9 here on the design wall. I like the zigzag effect of this layout. It still needs  a few more blocks added... maybe pink, brown, grey? Maybe I'll have to also make some half blocks for the outside edges if I use this layout?
Linking up to Rainbow Scrap Challenge

Friday, August 07, 2020

Machine Quilting Preparations

When I teach machine quilting, I always stress the importance of preparing and thinking through all the choices before you start:


I 💖 this machine!

1) machine - I only quilt with my 25+ year old Brother 1500.  It has been a work horse for all these years and it can reportedly stitch 1500 stitches per minute. I don't know about that as I would never sew that fast, but it sure does a great job! (no affiliation to any of the companies listed here, just a really happy customer of these products)
2) thread - for me, it's always Aurifil 50 weight. My machine loves this thread and I never have tension issues to deal with, so I buy it by the cone (6452 yards/5900 metres).
3) needle - I have the best success with the topstitch 90 needle for machine quilting. I do not have any skipped stitches (when I'm using the Warm and Natural batting which I purchase by the roll).
Oil, quilting foot, needles and bobbins
4) oil - add lots of oil before quilting so the thousands of mechanical movements can be smooth and slick.
5) bobbins - I usually wind up 3 bobbins full of thread to start quilting a project.
6) quilting foot - I chose the open toe embroidery foot for the free motion quilting on this project. The thing I dislike about it is that it gets caught on every pin, but I like being able to fully see when I am quilting loops. I will try to be very careful when I rearrange the quilt as I go along to avoid snagging the pins.


orange duck watching the looping stitches
I decided to start by quilting loops on the sashings. I enjoyed visiting the scrappy blocks as I quilted on by. The goal was to make all the loops go in the same direction, but I couldn't seem to remember that, and they ended up going every which way. 

***The invitation of machine quilting is... to suspend your perfectionistic tendencies and ENJOY the process wherever it leads and however it looks! It helps me to remind myself that I am not trying to create a masterpiece, I'm just trying to finish a quilt!


In this block the deer is running away, the fox is sound asleep, and the rabbit is supervising the quilting!

Thursday, August 06, 2020

Pin Basting

Shoo Fly quilt top
The Shoo Fly blocks have become a finished quilt top! This project was started last July as the Quiltville leader-ender challenge and my version has 140 Shoo Fly blocks that finish at 4". Some of the sashing is white and some is a light floral. I decided not to add a border and just proceed to quilting.

I would like to give mention to Cathy at Sane, Crazy, Crumby Quilting who has inspired me by making incredible complex scrappy quilts using her totally scrappy approach. 


Ready to pin baste
I used her random layout technique in this quilt... picked 4 Shoo Fly blocks and sewed them together with white sashing, then I randomly sewed the sets of 4 with floral sashing. I love how it turned out!

There are A LOT of small pieces of fabric used up in this quilt, the blocks did not all measure exactly 4", and there are A LOT of seams. It's a little wobbly and hilly in spots, so I'm a bit worried that it might be challenging to quilt. 

Kwik Klip tool

I started the pin basting during a family zoom, and this photo shows me using my favourite Kwik Klip tool to insert and close the basting pins. It makes quick work (less than an hour) of putting 140 pins into the quilt. 
I will post tomorrow about how I prepare for machine quilting.