Showing posts with label Fabric Painting. Show all posts

Friday, June 15, 2018

Glue Batik Painting

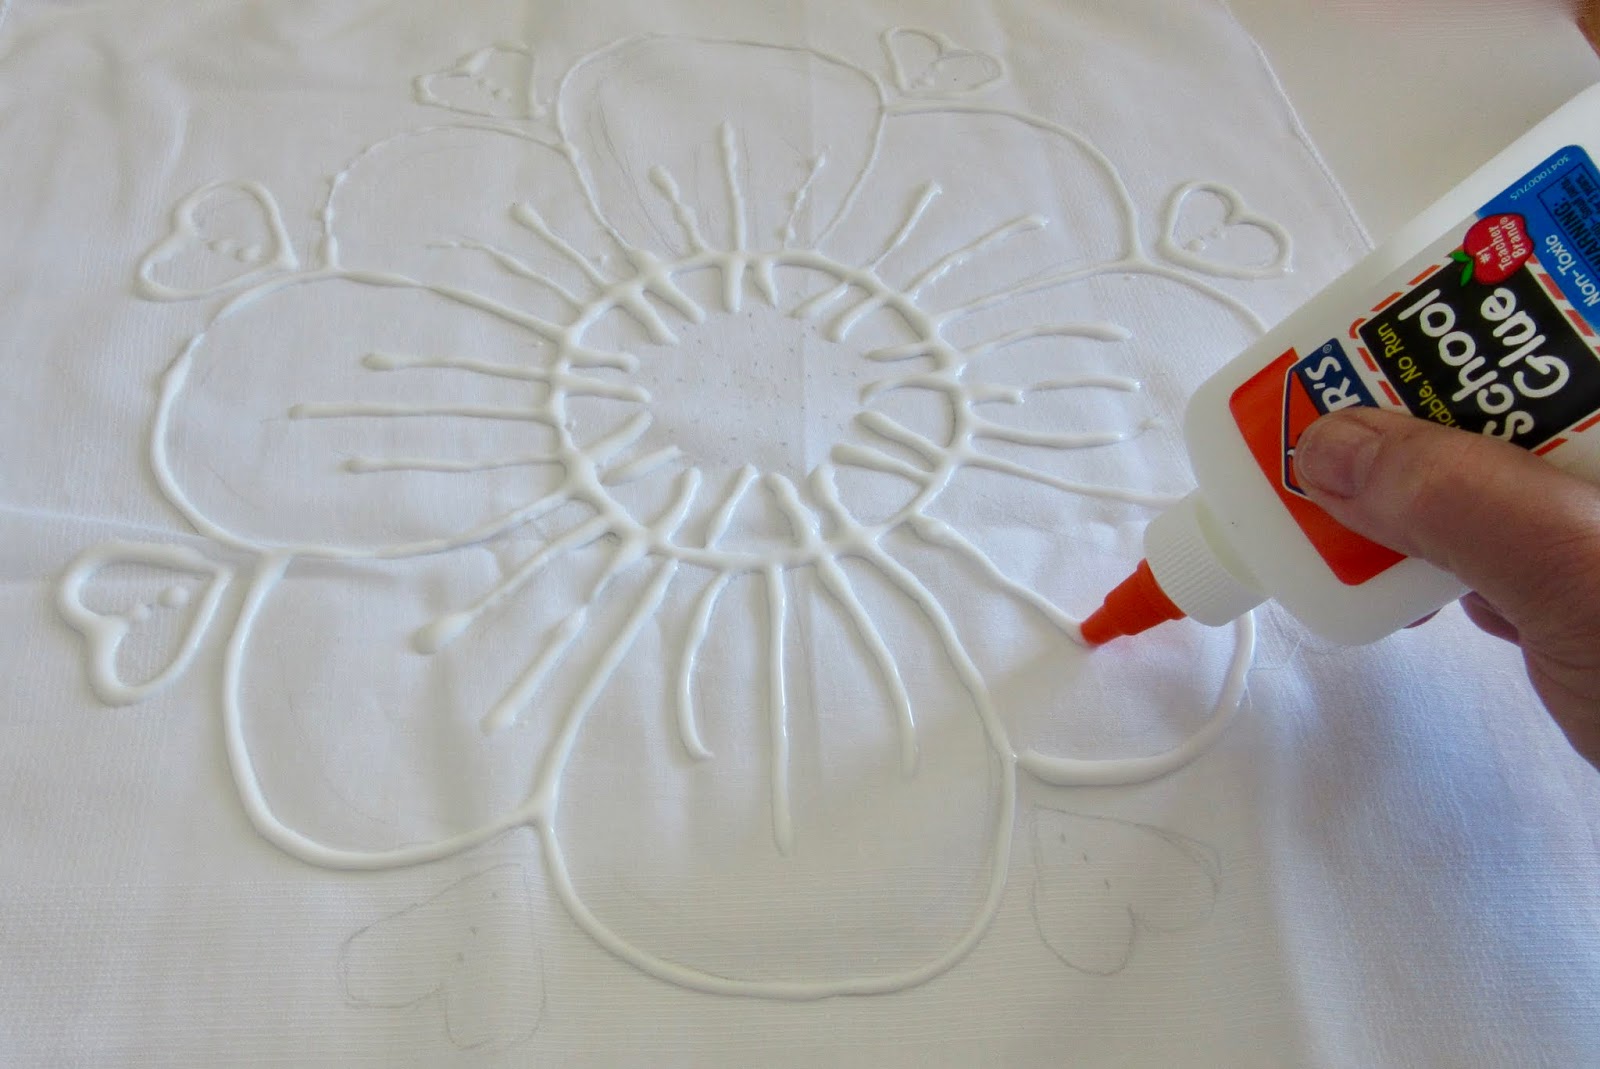
At a recent weekend away with some friends we decided to make glue resist batiks. We watched a glue batik video and gathered some supplies... plain white handkerchiefs, Elmer's white glue, acrylic paints and paint brushes. We drew our designs with pencil and traced over the lines with the glue. 


My glue line was way too thick and took too long (overnight) to dry. Lesson learned. Once the glue was dry, we got out the paints. The dried glue contains the paint and prevents the colours from bleeding into other areas. I've done a lot of fabric painting with Setacolor paints but not much with acrylics. Both are fun.


Once the painting is dry, you put it in a hot water bath to dissolve the glue. There was definitely some colour loss in that process.
Here is the finished piece hanging outside on a table to dry. When picking up the freshly painted fabric some paint transferred from one area/colour to another.  You can see some blue where orange is, and some red where only blue should be. You can't control all the elements! That's life!


Here it is pinned to the design wall, which shows that some of the colours are much less intense once the paint dries. I'm looking forward to hand quilting this over the summer.
And I'm going to get more supplies for the kids to try out this technique on our annual family camping trip this summer.

Monday, June 20, 2016

Summer Solstice Design Wall

Today is the longest day of the year AND it's a full moon, which makes it as rare as a whole cloth quilt! It's the first time it's happened in 70 years. I'll be celebrating that we made it through another winter of life, and now its time to celebrate the power of light over darkness! Hey, I look for any opportunity to celebrate!

And here's another reason to celebrate...
on the design wall today are all the sample sandwiches from the machine quilting class I took at Quilt Canada last week (details are here). I'm just letting all that inspiration soak into my brain until I decide what to do with these. Maybe I'll join them in a quilt-as-you-go style to have as a reference for the future.
I hand painted these blocks the week before Quilt Canada, so that I would have something pretty to practice my quilting designs on instead of plain fabric.
I used my favourite Setacolor paints and had a great painting day. It was dry and hot outside so the fabric dried very quickly and I didn't get much effect with the salt. When the paints dried, I heat set them with a hot iron, cut them into 8" squares and I was ready for the class. So fun!
To see more design wall postings, hop over to Patchwork Times.

Tuesday, March 29, 2016

Painting and Beading

I just finished teaching a biweekly beading class for the Canadian Embroiders' Guild and was totally inspired by these creative stitchers.
The first class we painted on fabric using Setacolor paints. In Canada these paints are available from G & S Dye.
I had forgotten how much I love to paint fabric...we had so much fun!
These are some of the paintings made by the students.


Can you see the white kosher salt? It is sprinkled on a painting to give some special effects.


Just look at how the salt is affecting this piece as it dries! The salt is not moving across the fabric, but the salt absorbs the moisture and makes it look like it is drawing the colour across the fabric.


Beaded Bindings

In the following weeks the students learned how to prepare the fabric for beading, practiced a variety of beading stitches, and discussed the process of intuitive bead designing. The last class was on beaded bindings and finishing the projects. 


These are two of the pieces made in the class. I was inpsired by these creative students, and I hope they had as much fun as I did! 

Friday, June 29, 2012

June Free Motion Challenge Report

I have completed the June lesson for the Free Motion Quilting Challenge by Cindy Needham. It was a very extensive lesson, and took by far more time than the previous lessons...all great information, and opportunities to try new things. I enjoyed Cindy's ideas on learning how to work with the sound of your machine. First we were to practice three basic shapes - repetitive lines, circles and the S curve, and then try the "divide and conquer" exercise. Here is my sketch book practice. FUN! Okay...time to quilt it!
Then all of a sudden...panic set in. 
I enjoyed the pencil work, but wasn't ready to start the quilting. 
Next step... procrastinate! Got a cup of tea, decided to paint a new piece of fabric to quilt on, and tried a new resist technique using Elmer glue (from LuAnn's blog), which worked out really well.

Then, I cleaned up my sewing tables, and sorted out my thread box, and picked out a few threads to try. How many purple threads does one quilter need?!?
Waited a few days for the painted fabric to dry.  Did more pencil practice, had some more tea, and even resorted to trimming blocks for my Sweet Treats quilt!
Okay...what is going on?!?
Cindy calls this state "disequilibrium".
And then I realized that I didn't need to make my quilted piece exactly like my sketch...it's FREE motion, so just be FREE!!
And just start!
Wait...I need more tea!
No! Just need to be brave and make one line.

Good job!

Now what?!?! 
Yikes!
Just quilt one section at a time. Divide and conquer!
Breathe. Quilt another section.
Relax.
Keep quilting. 
No going for tea!

Hours pass...

And...voila!

Wow...that was fun!

Now what was all that procrastinating and fussing around about?!?


Here are my first six lessons. I am sad that I didn't use a darker thread on the yellow/orange block because I loved those designs but they can't be seen unless you get your nose right up them. 
Lesson learned!
You can check out more than 100 posts from quilters who tried this lesson at SewCalGal...scroll way down to the bottom of that post to find the links.

Thursday, August 20, 2009

Painting and Paper piecing

I enjoy sewing the mystery blocks at Paper Panache and have made many of them over the years. These blocks combine two of my favorite activities - mystery quilting and paper piecing.  I have sewn the block that Linda currently has for sale on the Paper Panache home page which was a previous mystery block #38.
I have this guy up on my design wall and often think about sewing some cat blocks in the border, but just haven't gotten around to it.
(Hey... Linda has a free pattern to sew "a round tuit"  click here!!)
Anyway, it's too hot here to do much machine quilting these days, so I have been slowly working on the new mystery block #52. I had set a challenge for myself to use only fabrics I had hand painted.  (You can read about it here and see the colours I painted).
 I started piecing the blocks and quickly ran out of the light blue fabric  before I had sewn half of the pieces. 
So I got out the paints again and painted more blue. The problem is I never write anything down, so I had to figure out which blue it was, and how much water to add to get a matching colour, and then see if it was usable once it dried (paint always dries lighter). This was trickey and very unscientific, as is my usual style!
But I think I got enough blue yardage that is "close enough". 
Here you can see the parts I had finished piecing on the right, my instruction sheet with the colour chart, the scraps of the original leftover blue pieces, and the remaining pattern pieces to sew, all on top of the new blue fabric...what do you think....is it a close enough match?!?

Thursday, August 13, 2009

Quick Quilting Diversion


I am still quilting every day on my DD and starting to feel a little excited about approaching the binding stage...almost to the end of the marathon! I used a variation of the design that I quilted on the 9 patch blocks (see the 9 patch here) in each of the 18 setting triangles and the 4 corner setting triangles. Each step of this quilting has been quite labour intensive and I needed an easy and fun project to break up this quilting, so I worked on a quick gift for a friend. 
I painted this fabric using the Setacolor paints, which I love but are getting harder to find to purchase. I used foam flowers on the right side and set it outside to sunprint while it dries. The gold highlights don't show up well in the photos, but I was very happy with how it turned out.
Then I sandwiched it with a piece of warm and natural batting and outlined stitched the 11  flowers, then did some swirly curly stitching. It was fun fun fun..just what the quilting Dr. ordered for 
a quilting "pick me up"! Here is how it looks on the back. Now I think I'll do a little beading and finish it up. 


Sunday, June 29, 2008

Quilt Canada classes (cont'd)

My second class at Quilt Canada was fabric painting with Margie Davidson. This was my favorite class because it was pure play time! These are the paints that were in our class kits - 4 transparent paints and 1 opaque...all Setacolor paints.
They are my preferred kind of fabric paints so far, because I like the hand of the fabric once they are dry and because of their sunprint abilities. This was my first experience with the opaque Setacolor and I didn't like it, because the hand of the fabric (almost stiff and crunchy) ends up to be similar to the Color Vie paints, which produces a fabric that is too thick/hard for the kind of intense beading I sometimes like to do. But I can see a limited use for the opaque paint for special effects, especially in a gold or copper colour.
Here is Margie on the right teaching us about wet vs. dry painting and how to scrunch paintings for special drying effects. Margie was a great teacher - organized, enthusiastic, an expert in her subject, and her handouts were the best of any class I have ever taken - clear, creatively organized and space for the students to write down their own comments as they learn. She also gave me lots of painting ideas that I hope to try out with the kids over the summer.
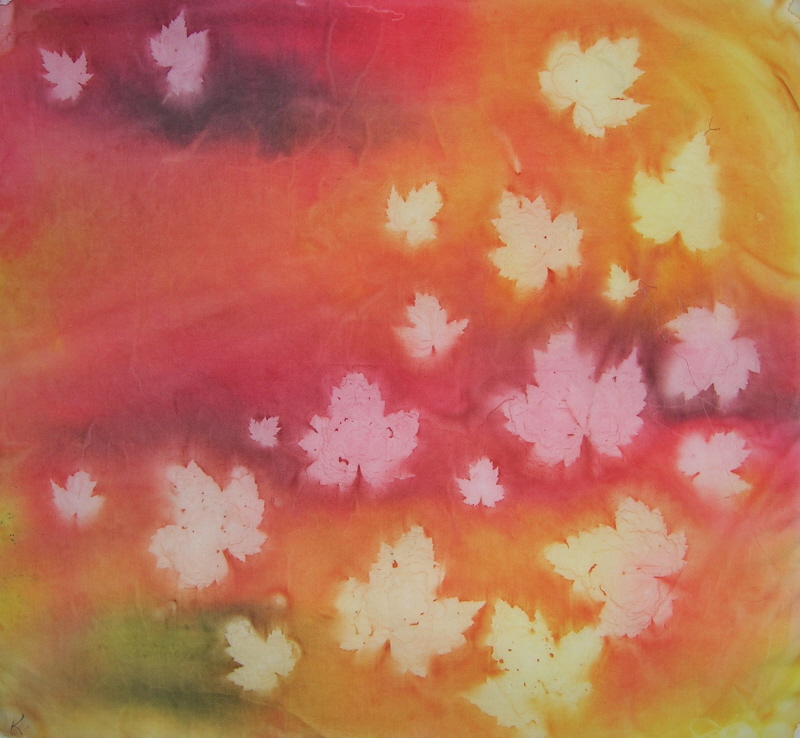
Here are the first class paintings on the drying rack. These were later overpainted and used for experiments in sunprinting. The Setacolor paints have this unique ability to produce silhouettes, even without the sun. On the right is one of my favorite sunprinted fabrics from this class...made using maple leaves, a small piece of plastic canvas, and a large piece of rubber shelf liner.
Stop by tomorrow to read about my class with Valerie Hearder.

Wednesday, April 23, 2008

Day at Reichards

What a fun day today! I taught a beginner's fabric painting class last month at Reichards and today the students brought back their work and started to do some quilting. Here are some of their favorite paintings. Next month we will work on embellishing. This has been my favorite class to teach for a few years now, since I still really love fabric painting.
And while I was at Reichards I signed up for a new BOM called "Be Attitudes". I haven't done many BOM quilts, but I know that this will be the perfect gift for a special someone...whenever I can possibly get it finished! You can see a photo of the quilt here. It will also give me a chance to practise some of the fancy stitches on my Janome Jem Platinum sewing machine.

Saturday, November 04, 2006

Fabric Painting Class

Last month I taught a fabric painting class and today the students returned with their paintings - dried, heat set, and ready to quilt. They did a fantastic job learning how to work with the Setacolor paints and over the past month they have experimented with the techniques. Today we spent the first part of the class looking at the paintings, soaking up the creativity and learning new ideas from their work.
The painting on the left was made by Cathy. The class decided that it looked like a Monet painting. She is thinking about making it into a water scene. It was heavily salted when wet, which gives it the mottled texture.
The painting to the right was made by another Kathy in the class. She made some beautiful sun prints using leaves and this one has great movement. We were amazed that she found a day over the past month which had both sunlight and no wind!!
Ruth created this blue painting (on the left) using water softener salt. I haven't used this kind of salt before and she got some great effects with it. Does anyone else see a tree that wants to be quilted in this painting? Ruth also made some creative sunprints using coins and jewelry!

The painting on the right was made by Danielle. This photo is deceiving because it is actually a large painting, with brighter colours than you see on the screen...I'm still learning how to use this camera properly! I'll try to get a better photo next class.

The painting on the left was made by Gerry and it is also a sun print, using leaves from her yard. She told us that many of the leaves blew away and had to be repositioned, but it
turned out great!

This painting on the right was made by Geraldine and she spent lots of time overpainting some of her pieces. This piece has several unique treatments in drying and painting.
This piece on the left was made by Sheila, who has experience with fabric dyeing and she tried some interesting techniques to make this landscape, including the use of Saran Wrap, and shaving cream!

As you can see the students are very creative and each are developing their own style. Next month we will meet again to further work on turning their paintings into quilts.