Friday, May 31, 2019

Goal Accomplished!

It was a hard push to the end of the month to finish this quilt. It was an ambitious goal to start with but am so delighted that this quilt is now finished! 
Here it is hanging on my friend's clothesline because I finished the binding while visiting her. It is a heavy quilt using up almost 5 bobbins of thread!
On Ringo Lake


This is the Bonnie Hunter Quiltville mystery called "On Ringo Lake" started in November 2017. I'm very happy with how the design turned out since I used the blocks that were designated for the sashing as the border blocks instead. I love that zigzag border!
Finished size: 62.5" x 80"
Linking up to One Monthly Goal and Favorite Finish!

Wednesday, May 29, 2019

Quilting Woes

After bragging yesterday about finding the perfect machine quilting combination of machine, needle, and thread, I started having problems. I broke a needle! I very rarely break a needle. These are strong needles made of hardened chrome plated steel, so when they break there is a loud sound and it's scary!
I calmed myself down, replaced that needle, changed the quilting foot and vowed to slow down.

another broken needle
But then I broke a second needle! 
I have quilted so many quilts and never broken a needle, so it was shocking to have TWO breaks on one project! I reminded myself that this quilt has a lot of intense piecing in it, and lots of bulk at the seam joins. I decided to have more respect for my poor old machine trying to power through the big lumps of fabric where blocks join together. 
I pushed through the frustration, slowed to a snail's pace, and finished quilting the blocks. 

Then for the border quilting, I stitched a zigzag quilting line on both sides of the accordion pattern. It was very tedious with the walking foot, with so many twists and turns of the quilt each time the direction changed. So I switched to the free motion foot.  Ahhhh... delightful! My accuracy declines when I'm stitching straight lines with the free motion foot, but I am willing to sacrifice perfection for enjoyment! It's just so much fun when you have the perfect combination of the right quilting foot, needle, thread, and speed.

The quilting is finally done and I have 2 days to make the binding, get it attached to the quilt, and hand stitched down to meet my May goal for OMG.
Oh the drama!

These are the lovely medium blue fabrics that were leftover from the quilt that will become the binding. There will be approximately 300" of binding to hand stitch by friday. It's possible that I might reach my goal if I work on it every moment that I'm not working or sleeping!

Tuesday, May 28, 2019

Progress on May's UFO

My version of Bonnie Hunter's mystery pattern from 2017 On Ringo Lake is finally being quilted. 
stitch-in-the-ditch quilting with walking foot
Quilting on a domestic machine is not something you see on quilting blogs very often. Most bloggers are long arm quilters or send out their quilts to long armers. I still really like to quilt my own quilts. I enjoy the creative process and as long as I have the upper body/arm strength to do my own quilting, I will.

Having said that, there can be some very frustrating moments. If you do a perfect job with the basting stage, everything lays completely flat and there are no puckers, pleats, or bubbles on the top or backing. 
evidence of basting fail
If you don't do a perfect job, you get this happening. See how there is a hill of fabric forming between the needle and the corner of the quilt where the pins are? This means I didn't pull the quilt top taut enough on this section while basting. Because this happens sometimes, I always quilt the stabilizing grid starting from the centre out, so that I can readjust and re-pin as necessary to push the excess fabric to the edges of the quilt.

Then I switch to the free motion foot and have some fun adding other quilting designs. 


Free motion quilting late at night!
Of course I immediately notice the place where 2 scraps ended up right beside each other. I remind myself that 'random' does not mean 'perfectly spaced' (insert smile) and I continue to quilt.

This is my favourite part of machine quilting. 
In the past with different needles and a variety of threads, I have experienced thread skipping, thread breakages, and thread tension challenges. 
But with the found combination of:
1) my Brother 1500 sewing machine (which is almost 25 years old and is still amazing!) 
2) a top stitch 90 needle, and 
3) Aurifil thread, I never have any problems.

Famous last words... as soon as I wrote this blog post, I started having problems. I jinxed myself!
Come back tomorrow to hear my tale of woe.

Monday, May 27, 2019

Baby Quilt Top

It's always a good thing to have baby quilts on hand because you just never know when you will need a baby gift.
It seems that most of the babies born in my social circle recently have been baby boys, and still I needed one more boy quilt.
I bought 2 charm packs on sale and found 2 grey fabrics (light star yardage and 2 dark fat quarters) with no actual plan in mind. It's a challenging way to make a quilt which I don't do very often, but eventually a plan came together in my mind while I was at quilt retreat.

This is how the growing quilt top looked when we went for lunch. It was looking like a hot mess! You can see the little tiny blocks on the sewing machine bed that I was piecing in between the major projects. They are so darn cute and distracting to me... must focus on baby quilt!

I decided just to frame the charm squares and made a layout of 5 blocks across and 6 blocks down, using the 3 frame fabric colours (dark grey, light grey and white) to make a diagonal block layout.

And then we went outside to find a "design wall" to photograph it on. You can see that the daffodils are up and the buds are just starting to come out on the trees.


I have been debating about adding a border or not. I think it's big enough for a baby quilt, but does it need a border? I have some white and light grey fabric left.

To see more design wall postings, hop over to Small Quilts.

Sunday, May 26, 2019

Slow Sunday Stitching

Welcome to the weekly hand stitching party!
Why not pick up your project and put in a few stitches today? That's exactly what I'm planning to do, but I have put in so few stitches recently that I don't have any of my stitching to share today. 


Sandy's quilt being auctioned
So I will show a couple of photos from the Mennonite Relief Sale that I attended yesterday. This is an annual event where over 200 quilts are auctioned to raise money for relief from hunger, poverty and natural disaster world wide, and for international development and peace keeping efforts. 


Sandy's quilt under plastic
I was only able to stay for half of the auction this year, but enjoyed the visual treat of so many lovely hand quilted delights.

This is a quilt that my friend Sandy made from the fabrics of a quilter who had passed away. Sandy pieced the quilt and it was hand quilted by Saleda Martin. You can see a better photo on the auction website here. It's always exciting to see a quilt being auctioned when the quilt maker is sitting right beside you!!


College quilt under plastic
And here is a quilt that the tag said it was made at the local college. I thought for sure that it was likely just "commissioned by the college" because it was very well made. But I spoke to the organizer and she said it was constructed in the fall and hand quilted in the winter by the students!


College quilt being auctioned
They called the quilt "X's and O's" and it was very pretty (more information and a better photo here). I think it would make a great scrap quilt and the creative wheels are turning in my brain!

Anyway, lots of money was raised for a terrific cause, and it motivated me to get going on finishing a quilt to donate next year. Click here to see the video clip that was on the local news about the event.

What are you hand stitching today?
Please share your project update in the link up below!


You are invited to the Inlinkz link party!
Click here to enter

Saturday, May 25, 2019

Scrappy Saturday

I started making Economy Path blocks in January for an RSC project that uses up the 1.5" pieces in the scrap bin. 


The first block I sewed  was for the Blockheads II project and I enjoyed it so much that I decided to keep making that block pattern with my scraps. 

Here are the orange blocks made this month. My goal is to make 4 blocks in the RSC colour of the month and then sew those 4 blocks together.

Here are all the blocks on the design wall. The blocks on the top right and left are "randoms" because sometimes there are just scraps sitting around on the cutting table that want to be sewn into an Economy Path block (pattern here).

Keep in mind that these are 3" blocks (finished) so this is still a very small quilt! I am thinking of continuing to make these small blocks for the rest of the year, and then next year make the same pattern in the 6" size. It's much faster to build a quilt with larger blocks! LOL

To see more scraps being sewn, hop over to the RSC link up and Oh Scrap!

Wednesday, May 22, 2019

UFO - On Ringo Lake

Some progress is finally made on this month's UFO.
Yes, I know the month is more than half over, but it took a while to get everything organized. I purchased, washed and pieced the backing yardage, and found it was 5" too short (grrrrr). I pieced a length of FQ scraps to add to the backing, bought the batting and finally got everything ready to pin baste. 
Basting is a fairly boring job so I tend to procrastinate the task. I don't like to spray baste because I do not have a "well ventilated room" and I do not want to inhale those glue fumes. So I do it the tedious way... with pins.


I spy a piecing error!!
As I was listening to music and about half way finished, I noticed a piecing error right in the middle of the quilt. I said something like "fiddle dee dee" (as I learned from my friend Gail!) 
Seriously, how could I miss that after all the time I had spent piecing blocks, and putting the quilt top together, and enjoying it hanging on the design wall?!?
I had already repaired an error in piecing and I could not believe there was another one. I was not going to undo all those pins and get the seam ripper out to fix it. I decided I will either applique a triangle on top after it is quilted or maybe even leave it as is!
Me discovering this error was a sight that no one should ever see, or hear, although my kids think a video of that might have gone viral on the internet! Fiddle dee dee!


Moving right along...
once I calmed down, I selected some quilting threads. Why do I have 4 very similar spools of blue thread?? Time to use up this thread! I wound some bobbins and started quilting my usual stitch-in-the-ditch grid to stabilize the 3 layers. 


Ahhhh.... back in my happy place again!

Monday, May 20, 2019

Quilt Retreat Project

Quilt retreat has already come and gone. It always goes too fast, like all wonderful things in life. 
One of my projects was this Kim Diehl pattern called Twinkle Trees from her lovely Simple Christmas Tidings book. I purchased the book and fabric kit as my Christmas present to myself in 2017 because I fell in love with the gorgeous sample quilt at Quilter's Nine Patch. And then it sat in the closet and waited patiently for a turn at the sewing machine.


tree top blocks
It was a lot of cutting to do all at once. I very rarely pre-cut an entire quilt top before I start sewing. But I did this time and it was a treat to go to quilt retreat and just sit and sew these fun blocks. First up was the 4 patch blocks, followed by many flying geese blocks.
  
Here are the 20 blocks that I finished at quilt retreat. I really like how scrappy they turned out.


And here on the design wall today is the first tree block almost ready to assemble.  

There are many more blocks still to sew, but it's too discouraging to look ahead and try to figure out how much more sewing needs to happen before the quilt top starts to take shape. So I'm just taking it one relaxing block at a time! 
Hop over to Small Quilts to see what other quilters have on their design walls today.

Sunday, May 19, 2019

Slow Sunday Stitching


Welcome to the weekly Slow Sunday Stitching party! Pull out your hand work and join us as we work on our stitching project.


blue flower moon
Do you know the saying "once in a blue moon" which refers to a rare happening? Well, a blue moon happened last night and it was called a blue flower moon. It doesn't have anything to do with my stitching today, but it was a fun thing to see last night.  It's also a difficult thing to photograph but I tried and this is the best I could do!

Today I'll be working on a scrappy quilt top made of triangles that were donated to the quilt guild scrap bin. I had enough to make a layout that I liked but wasn't sure how to finish the edges. After looking at it for a while on the design wall I just couldn't chop off the diamond sides. 
So I decided to fold the edges of the triangles, and hand appliqued the sides onto a strip of muslin. 


My friend Debby had a Clover product called a fabric folding pen and I tried it out to fold the edges of the triangles.  It was a little tricky to get the right amount of fluid to come out, and a couple of my triangles were too wet. Eventually I think I was using the right amount but it really did not seem to make enough of a difference in folding the edges to justify the $22. Have you tried this product? If you have any tips or comments, I'd love to hear your experience with this product. I hope to get these the two sides of this quilt appliquéd and ready to add another border.

What are you stitching by hand today?


You are invited to the Inlinkz link party!

Click here to enter


Saturday, May 18, 2019

Scrappy Saturday


This week I worked on finishing up with the teal scraps from last month and also working with orange scraps for my Rainbow Scrap Challenge projects. This is what my cutting table looked like with orange and teal scrap everywhere! I finished the orange log cabin loonie block (cutting instructions from Julie are here) but still needed to finish the teal one. These scraps were really fun to sew up. 


I was delighted to find the tiny horse to feature in the centre of one of the log cabin blocks.
Each log cabin block is 4.5", so when the four are joined together it makes an 8.5" block made of 52 scraps.


And here are the 8 mini log cabin blocks I have made so far. 
I really like the effect of the left column (green and gold blocks) offset by half a block. I think that could be a cool layout when/if I ever have enough blocks to make a quilt!

To see what the other RSC quilters are up, hop over to the weekly link up at Angela's.

Friday, May 17, 2019

Another Quick Finish

I enjoyed picking out the thread colours for quilting
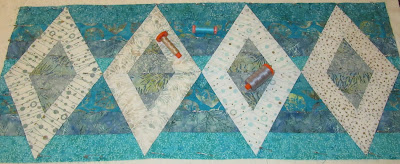
This project was started at quilt retreat last fall and is a pattern from Krista Moser called "Aztec Diamond".  
had fun using the 60 degree ruler and pieced the runner as soon as I got the pattern and fabric at last year's retreat. 
But then it waited patiently until this year to be quilted.

I machine quilted straight lines using the walking foot following the diamond design. I used the Hera marker to mark the stitching lines. Can you see the line it made right at the tip of the marker? It's quick and easy and one of my favourite methods of marking quilting lines.

Perfect place for hand stitching!

This is where I sat with my morning coffee and hand stitched the binding on the last morning of quilt retreat. It is still a little cool to sit outside, so you can see that I was joined by no one!


It was so peaceful and beautiful there. You can see that finally the green is returning in my part of the world.

Here is the glamour shot of the finished table runner on the bench by the fountain.

So happy to have another UFO finished!

Thursday, May 16, 2019

Finished Memory Quilt

pin basting and picking the coral thread colour
This quilt project started in January when I adopted a bag of 128 HST blocks that were abandoned in the scrap bin at guild meeting. The little HSTs were perfectly made and I had a lot of fun making the blocks and creating the quilt layout. Once the quilt top was together I couldn't wait to get quilting!


Using the walking foot I quilted straight lines in the middle of the quilt. Then I switched to the free motion foot and made some squiggly lines in those long white spaces.

I quilted free motion swirls in the borders. This photo shows the quilting design which is much easier to see on  the back of the quilt.
I hand stitched the binding which is my most favourite part of quiltmaking. I love these Black Gold Clover applique needles that are so sharp and thin that I can easily push the needle through many layers of fabric to attach binding without using a thimble. Although these needles are pricey compared to others (here in Canada I paid $9 plus tax for 6 needles) they are totally worth it! 

This quilt finishes at 24" square and will be donated to the memory quilt collection at my quilt guild. These small quilts are given to our local hospital for distribution to families experiencing the loss of a baby.

Wednesday, May 15, 2019

Scrap Dance Minuet Step #4

My regular blog readers know that I am a quiltaholic, always have many (hundreds?) of projects in various stages in production, and I adore mystery quilts. They are just pure fun! 
Step #4 of Carole's Scrap Dance Minuet was posted last week and these are my blocks.
step #4 blocks

I challenged myself in making this mystery quilt to use up old fabric, most of which I don't like, in an attempt to see if I could "make a silk purse out of a sow's ear". And do you know what?
The more I have cut and sewn these old fabrics, the more I have come to like them! 
Some people worry about making mystery quilts and think it might be a "waste of fabric" if they don't like the quilt when it's done. 
But it's the process that I enjoy so much. It's like a surprise adventure! And if I don't like how the quilt turns out, I am happy to donate the project to a worthy cause. There is always someone out there in the world who will like it and be thankful to have it. 
Next month is the grand reveal of the quilt layout and I can't wait to see what my "silk purse" quilt is going to look like!
PS...even easy sewing sometimes requires a seam ripper!! (bottom right block!)

Tuesday, May 14, 2019

Retreat Preparations

It's time to pack up for spring quilting retreat. 
It's always challenging for me to decide which projects to take. 
new project cut and organized for sewing
My friends take great delight in making fun of me over my project selection agony, but truly... it's a very hard decision!
I started a new project and precut ALL the pieces so that I can sit at sew at retreat... no thinking required!
There are so many options since I have piles of UFOs, and I want to take everything, but that is not realistic. Even at quilt retreat, there are still only 24 hours in the day.
I like to have a variety of projects because a quilter can never predict what she might feel like working on, right?!?! 


baby quilt ready to sew
I am taking 3 quilt tops to piece (LOL probably only 2 of them will see the light of day!), some candlemats and a tablerunner to machine quilt, my hand embroidery project, my Blockheads II to make more blocks (I have finished 26 of the 52 blocks), and of course a small quilt to finish the binding.
How do you decide what projects to take to a quilting retreat?!? 

Monday, May 13, 2019

Design Wall Monday

Remember back in January when I had a tiny distraction? It's a little blurry in my memory as to how the bag of tiny HST blocks got into my hands at a guild meeting, but somehow they came home with me. And they called to me until I made them into a quilt top that you can see here.


The original anonymous maker (let's call her "Rose") of the repurposed HSTs heard that I had adopted them and gave me extra fabric she had leftover from her project. It was exactly enough to add borders to bring the quilt top up to the size needed for the memory quilts my guild collects - 24" square. See how I put a bit of sashing around 2 cornerstones? That's because there was just barely enough fabric to finish those borders!
Can't wait to get going on the machine quilting!
Hop over to Small Quilts to see more design wall posts.

Sunday, May 12, 2019

Slow Sunday Stitching


Happy Mother's Day to all the Moms out there in Slow Stitching land! I hope you enjoy a wonderful day with your family and have a chance to fit in time for taking some slow stitches on your favourite project.


Gail Pan embroidery pattern
If you think embroidery and mermaids are a perfect combination, you need to know that it's Mermay over at Days Filled With Joy, so if you would like to stitch a few mermaid blocks, click here to get the first pattern. 
I'm being very disciplined and focused on my Gail Pan blocks from the 2018 "I Stitch Club" project. I'm happy to be finished with the winter theme blocks and have moved on to the spring theme. Isn't this one sweet?

What are you hand stitching today? Link up your blog post below and share your slow stitches with us...


You are invited to the Inlinkz link party!
Click here to enter


Saturday, May 11, 2019

Scrappy Saturday - Orange


May is orange month for the Rainbow Scrap Challenge quilters. Orange isn't one of my favourite colours, but it is one of my favourite foods!
YUM!As I was organizing orange scraps this week I noticed the wide range of oranges... from dark rusty orange, deep red oranges, bright fiery orange, happy carrot orange, mellow yellowy orange, to soft pastel coral orange. It really is an interesting colour to explore!

These are my blocks for the project I was calling "scrappy doughnut" (originally inspired by Temecula's One Block Wednesday project). But Karen told me that Barbara Brackman calls this block "The Wishing Ring" and I LOVE that name!

So doughnuts are out and wishing is in! 


Here are all the wishing rings on the design wall placed in a diagonalish (is that a word?)
layout. I think I'm really going to like this quilt when some of the darker colours get  added.

To see more RSC projects, hop over to the weekly linkup at Angela's.