Thursday, March 30, 2017

UFO of the month

I have had my nose to the quilting grindstone this week in an attempt to finish my March UFO. At the beginning of the month, the plan was to machine quilt one line of stitches straight down the middle of all the sashings, which would have been 12 straight lines. 
I quilted those lines, and then was inspired/obsessed to further quilt the sashing areas with a diamond design, which meant an additional 48 zigzag lines of quilting. 
Honestly, when inspiration hits, why isn't it ever something quick and easy?!?!


I learned this double diamond design in the Quilt Canada class with Melissa Marginet last year. Melissa has published a new resource book called Walking Foot Quilting Designs and it includes how to make this grid pattern. The pattern involves a lot of planning, measuring, and marking using a 30 degree angle. And then there is a lot of twisting and turning of the quilt to follow the lines, but I am so happy with how it's turning out. Everything is laying completely flat now, even some spots that were a little "puffy" before.
I really like how the sashing intersections look. I couldn't envision how that was going to turn out, but it's really cool!
However, this added quilting is taking so much more time than I anticipated, and with all the twisting and turning of the quilt (which is getting heavier with every line of quilting that I add!) it has been hard on my shoulder joints. I can only quilt for a couple of hours at a time, and although I am trying hard to finish this quilt for the end of the month, it's iffy. If all goes well, the binding may go on tonight, and a March finish might be possible just under the wire tomorrow night. Such drama! I tell you, it's an exciting life I lead! *snort*

Wednesday, March 29, 2017

Wednesday is Blockhead day

The 4th block will be posted for the new Blockhead sampler quilt today. Last week was a quick and easy variation of the ohio star block called 'Four X' and posted over at Jo Morton's blog. I am enjoying using up the reproduction fabric scraps that are left over from my Votes For Women quilt (which I hope to finish this week!!)


Here are the first 3 blocks for my sampler quilt. 

Buzz on over to block #4
...it's an appliqued bee skep!

Tuesday, March 28, 2017

QAYG method

My Votes For Women is in 3 quilted sections and is ready to join together into one big quilt. This blog post highlights some of the things I have learned about the technical challenges of using the "Quilt-As-You-Go" method of joining blocks or sections of a quilt together. A few years ago I took a fabulous QAYG class with Martha Schellingerhoud and she showed us 3 methods of joining the quilted sections by hand and/or by machine. This blogpost is not meant to be a tutorial for the technique, I am just sharing some tips that I have learned along the way. You can click here for a great step-by-step lesson with photos. I am not using the exact same joining method as shown in this link, but it's similar. 

1) For this method of joining, I do not quilt near the edge of the sections. I give myself at least 1" between any quilting and the edge of the quilt. See where the screw driver is pointing to? That is as far as I quilt until after the sections are joined.  Believe me, it will just be easier to handle if you join the sections the way I am with this quilt.


2) Trim all sections carefully - the backing, and the quilt top should all be exactly the same size. The batting will be trimmed 1/4" more by hand once the sections are joined. 


3) To join the quilted sections together, use lots of pins. You are joining two sections with right sides together and are only sewing the quilt top edges together. 
Pin the edges together and then pin the batting back and out of the way so you don't sew it accidentally. Pin more. Don't even attempt to join two large sections without pinning it to death. And then add 2 more pins! I guarantee that you will not be happy with how everything lines up (or not!) if you don't use all the pins you own.


4) Once the sections are attached, I lay the whole thing out on the table and trim any excess batting between the sections with scissors, being very very careful not to cut any fabric. I trim the batting in a slightly wavy line, which I like to think prevents the join from being too visible. I'm not sure if it effectively does that or not, but it's what I do. Then I hand stitch the batting together using a ladder stitch. When all of these steps are done well, the batting will lie flush and flat, with no gaps along the join.

5) The last step is to fold over at least 1/4" on the edge of one panel and hand stitch/applique it on top of the other panel, just as you would stitch a binding edge. I like to do this by hand so that there are no stitches on the front of the quilt from the join.

6) Once the seams are all finished on the back, then you can add more quilting. I plan to quilt all the horizontal seams from one side of the quilt to the other, which further holds all the batting sections together. And then I'll probably do more quilting... the blocks are heavily quilted, so the sashing will likely need more quilting.

Quilt-as-you-go is a construction method I enjoy since it allows me to do all my own quilting, even on the largest quilts. These are two of my other quilts I have finished using this technique - Swoon, and Scrappy Memories

Monday, March 27, 2017

Design Wall Monday

The design wall is covered with asterisk blocks today. I am almost out of those weird green background fabrics, so I need to figure out the setting for these fun blocks and get them turned into a finished quilt. I'm undecided about whether to keep the X blocks or make them all into asterisks. In the photo I really dislike the X on the left in the middle row. It might not make it into the quilt at all. Of course I'm loving the little asterisk blocks and want to make more of those. I took these blocks along to share with the Paris Quilters on Saturday.
We had a great day practicing how to construct a variety of improv blocks including asterisks (which were the group favourite), houses, and different types of letter blocks. I love a group of women who are fearlessly willing to try sewing anything, who tell inspiring and heart felt stories about their quilts and their quilty adventures, AND who also have a fantastic sense of humour!


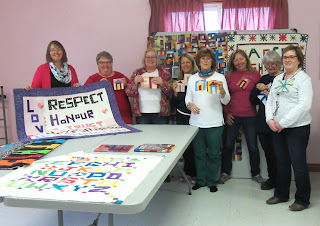
We had so much fun and I was sad when the class was over and it was already time to pack up and go home. Here are some of the quilters who attended the class and you can see some of the quilts I brought to show various ways of constructing letter blocks.
These are the books and websites I recommended:
-"Word Play Quilts" by Tonya Ricucci
-"Out of the Box" by Mary Lou Wideman and Melanie McFarlane
-Patchery Menagerie blog by Lynne Tyler
-Asterisk Quilts by Karen Griska
-Temecula Quilt Co. baby letter quilt (not improv, but another fun way to sew letter blocks)
To see more design wall blog posts, hop over to Patchwork Times.

Sunday, March 26, 2017

Slow Sunday Stitching/Resting

It's Slow Stitching Sunday - the day of resting, moving slowly, breathing deeply, and hand stitching. Resting is an activity, and is a verb. To rest means to "cease work or movement in order to relax, refresh oneself, or recover strength" (Mirriam-Webster Dictionary). In past generations, people believed that resting was an essential element in a healthy, well balanced life. But now I often hear (and have believed) that resting is not valued. For many people rest = lazy, and it's something you only do on vacation once a year (unless you get completely burned out before then and your body makes you go on a forced leave!)

I have only learned the value of rest in the past few years, and realized that the ability to power down your brain, and let it heal itself is vital to wellness. Of course getting enough sleep is also important, but I'm talking about being able to be in a restful state while awake, to take a complete break from your activities and your worries, and to achieve a state of deep relaxation. 

The quickest way for me to accomplish total restfulness is by hand stitching. When I'm hand stitching, I am not thinking about anything else except where the next stitch is going. And I must pay attention to this task, because injuries are caused by inattentiveness. When I don't focus, I poke myself with the needle and bleed! 
I take deep breaths, I focus only on the next stitch, and I don't allow any worries to enter my mind. 
So every Sunday I am writing a permission slip for you (and me) to take some time to fully relax! You are not being lazy. Get out your hand stitching project and know that you are investing in your own wellness by relaxing and taking good care of yourself.
Here's the link up if you want to share how you are relaxing with your hand stitching today.


    An InLinkz Link-up
   

Saturday, March 25, 2017

Scrappy Saturday

Major progress was made with the red scraps this week. I finished another Mad City Mama block (pattern from Bonnie Hunter's book Adventures with Leaders and Enders). 
Red was a fun colour to play with and I had many prints with little graphics that I could fussy cut. 
As soon as I took the photo, I could see that I forgot one of the light triangle corners. But it was easy to add in, and voila... here are the 8 blocks on the design wall.

WOW that's a lot of scraps!

Only one more block to go. 
What colour should I add?
Brown?
Gold?
Grey?
Lime green?

To see more scrappy red projects, hop over to the Rainbow Scrap Challenge link up.

Friday, March 24, 2017

UFO Machine Quilting

My March UFO project is finally seeing some major progress this week. In truth, this project has really been my "UFO of the month" since last September - sad, but true!  The third and last panel of Votes For Women was pin basted the first week of the month and since then the quilting has been coming along well. 

First I put the walking foot on my sewing machine and stitch in the ditch to stabilize the edge of each block. 


Then I change to the free motion foot and make up a stitching design for each block that has the longest continuous line of quilting I can think of. It's a fun challenge to make a different design for each of the 14 blocks in the panel that I am quilting.
I anticipate being able to sew the three panels together next week, with a possible finish in sight. I am trying not to get too excited!

Thursday, March 23, 2017

Scraps and Improv

I am teaching an improv piecing class in Paris (in Ontario, not France!) on Saturday and am getting all my samples out of the closet. I decided that I really wanted to have my Scrap Vortex finished to show the students. It's one of my favourite quilts and it demonstrates how you can use crumbs, scraps and letters to make an "interesting" quilt. 


I started this quilt in June 2015 and this is how it looked when it came out of the UFO closet this week.

I still loved it, and particularly loved that the 'S' in SCRAP turned out to look not as bright as the rest of the word. That's seredipidy!
However, I really wanted to have the word 'vortex' in the quilt, so I pieced the letters, surrounded them with scraps, cut the quilt top in half and inserted the vortex strip.


Here it is...
UGH!
OH NO! 

Definitely not serendipity!

The R's cannot be right above each other! That just didn't look like how I had envisioned it!


Out came the seam ripper, and the quilt top was dissected again! 
I inserted a scrappy strip between the words. 
Better.
But there are a few things that need to be changed so I can like it more. And a great border idea popped into my mind, so this project isn't close to being a finished quilt top yet! But it's ready for a road trip to Paris on Saturday!

Linking up to Cynthia's Oh Scrap! party!

Wednesday, March 22, 2017

It's Blockhead Day!

Have you started the Blockhead project yet? Information about the project can be found here and many beautiful versions of block #1 can be seen here


This is my version of block #2 called Aunt Dinah (link to the pattern can be found here).


These are my first two blocks for this sampler quilt. 

Wednesday is the day that the next block pattern is posted, so I'll be hopping over to Jo Morton's blog today to see her block. 


"Resistance is futile" of course! If you've been strong enough to resist making these cutie pie blocks so far, I am amazed by your self control! 

Monday, March 20, 2017

Aurifil BOM Quilt Top

You never know how a project is going to turn out, especially when it's a mystery BOM. I would love to know the statistics on the number of quilters who start a BOM and actually end up with a finished quilt. Some interesting quilty statistics can be read here from the 2014 survey of American quilters, but there are no statistics gathered on the number of blocks sewn/started/sitting in UFO cupboards.
I have my fair share of those that may or may not become a finished quilt one day, but I have learned something and increased my skills with every block I have sewn. And every once in a while, blocks actually do become part of a quilt top.
Here's my most recent accomplishment...
the Aurifil BOM from 2016 (free patterns are still here). The size of the quilt top is 62.5" x 82".
Although it is a 2 colour quilt, it really is a true scrappy quilt with it's huge variety of red and white fabrics. I was determined to not buy more fabric to finish it, so I had to substitute another red for some of the block sashings. Many of the sashings are pieced from scraps. And the inside light sashing is a different size from the border sashing because I was running out of that yardage too. It was a huge logic/math puzzle (not my strength) which makes this seem like a bigger accomplishment to me than usual!
This will be the perfect project to be quilting during Canada's 150th birthday year!
You can get the instructions for Pat Sloan's layout here, and see a few finished quilt tops at the link up.
To see more design wall postings, hop over to Patchwork Times.

Sunday, March 19, 2017

Slow Sunday Stitching


Happy Slow Stitching Sunday! 
Welcome to the weekly blog link party celebrating the art of hand stitching. We recognize how long it takes to make hand stitched creations and we want to encourage you along that slow process.
This is what I am working on today with my Life is Beautiful blocks. 
The 4 patch background squares need to be pieced and then I will hand applique the 4 patch circle (on the bottom left) and the strawberry applique (on the bottom right) onto those 4 patch blocks. You can see the small circles in the centre of the photo which will be appliqued onto the corners of the blocks when the whole quilt top is together.  I'm not exactly sure how that's all going to be done yet. I'm taking one slow step at a time!


Also I have been continuing to take one stitch a day (and sometimes a few more) on this project. Here is how my "1 Year of Stitches" embroidery looks today. The pattern is from Wild Olive.


What step are you taking today to move your hand stitching project along toward completion? Go ahead and pick up your needle and thread, and put in some stitches. Take a small step and/or stitch every day!
And then write a blog post about it and link it below. We are cheering for every step you take toward your goal!

   
    An InLinkz Link-up
   

Saturday, March 18, 2017

Worldwide Quilting Day

Today is Worldwide Quilting Day when we celebrate quilts and quilters around the world. The Quilt Show is offering free viewing of over 200 of their shows this weekend, so there is lots to watch while we sew.

I am excited to get my sewing machine out and start creating something. Yesterday was all about putting on the green for St. Patrick's day, and today is all about the red over at the Rainbow Scrap Challenge. This is what my cutting mat looks like today with partial pieces for another Mad City Mama block. 
Happy Quilting Day!

Wednesday, March 15, 2017

Building Loving Neighbourhoods

When I was at quilt retreat, our guild president showed us how to sew improv house blocks starting with any sized square. It was a little bit scary at first since I didn't want my houses to be totally crazy looking. But every block was more fun to sew than the last. Here are some of the blocks we made at retreat from scraps of batik. Marjorie is going to turn them into a donation quilt. 


Building houses with my Singer 301 (Ethel)
When I heard that the members of the Montreal Modern Quilt Guild were making quilts to donate to the families of the victims of the Quebec City shooting, I couldn't resist participating.

The guild requested 12" house blocks. So I made a little neighbourhood using the Stash Bee tutorial (which is exactly what we learned at retreat) for improv house block construction.  My little houses started out as 6" charm squares and ended up between 4" and 5". 
9 house blocks were joined together to make this 12" neighbourhood, which is in the mail on the way to Montreal.
One little quilt block will not change the world, but it will be part of the efforts to provide more love and comfort in lives and situations where fear and darkness live. 
Linking up to the Let's Be Social party!

Tuesday, March 14, 2017

301 Singer Sisters

I enjoyed a fun but short visit with the Erin Quilters last night. It was wonderful to see old friends again and have a quick visit. It was a very snowy drive, so I didn't stay for the whole meeting and was relieved when I arrived home safe and sound.
Sewing on a Free-Westinghouse
I hope to have some sewing time tonight with my 301 Singer Sisters! They are my beloved work horse sewing machines from the 1950's, so of course I have affectionately named these old girls Lucy and Ethel. I make sure to give them a regular workout to keep them in good sewing condition.

Singer Sisters
The threading of these slant needle machines and their bobbins are a bit different from the majority of machines that I use regularly, so I often need a reminder of how to thread the needle (from right to left) and how the bobbins unthread in their cases (the opposite direction of my Brother 1500). A great resource for 301 machines is found at SewUSA. There is a lot of information on a wide range of machines and you can access the threading diagrams here for most of the brands you can think of. Here is the direct link to the 301 information.
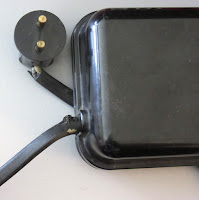
Ethel's wiring is a little on the unsafe side, and she probably needs to be re-wired, but that is one job that I haven't learned to do yet. I keep her workouts brief and hope I don't electrocute myself or start a fire! But every time I use these machines I remember how much I like the sound/voice of these machines, and what a nice stitch they make.


I have started making some improv house blocks and need to build a neighbourhood... by Wednesday!

Monday, March 13, 2017

Design Wall Monday - Clarissa


Happy Monday
Happy Monday! 
It's going to snow here today and into tomorrow, and I'm supposed to be speaking tonight at the meeting of the Erin Village Quilters. I hope the driving will be manageable for all of us. I am really looking forward to seeing some of my old friends and meeting some new ones. 


I have been busy sewing scrappy quarter square triangle blocks and have finished my 9th block for the Clarissa was a Superstar quilt. This is my leader-ender challenge project, but I like it so much that it sometimes demands to be the primary project. I remind it that it is a leader-ender project and must wait it's turn to be slowly built in between other quilts! Yes, I do talk out loud in my sewing room, and yes there are interesting conversations between me and my quilts!

Here are the 9 blocks on the design wall... wow I love this project! Total triangle tally is 1,296!
To see more design wall posts, hop over to Patchwork Times.

Sunday, March 12, 2017

Spring Forward

Welcome to the weekly Slow Sunday Stitching link up!
Did you turn your clock ahead one hour last night to adjust to "daylight saving time"? Although it's not as stressful of an event as it was when my kids were young (and the adjustment was simply miserable), it is still a change that takes some getting used to. 
Daylight Savings Time!
Reportedly there are more car accidents and heart attacks following the time change. It takes time to recalibrate your body schedule, especially if you already have difficulty sleeping. Also, there is a noteable increase in "cyberloafing" which is the term for wasting time on the internet, reading Facebook, twitter, email and blogs. We are just generally more tired!
So here's my public service announcement: 
it is recommended that you enjoy some tea and some relaxing slow stitching time this morning, and then have a nice nap this afternoon, followed by a bit of cyberloafing while you check out the links below, and then do more slow stitching tonight when you can't get to sleep!

While I adjust to the time change, I'll be adding more stitches to my "1 Year of Stitches" project. This is how it looked yesterday on the 70th day of 2017.
To check out the unbelievable project photos posted on instagram click here
Please link up your blog post below and tell us if you have daylight savings time where you live, and what you'll be hand stitching today.


    An InLinkz Link-up
   

Saturday, March 11, 2017

Scrappy Saturday

March is the month to use up your red scraps over at the Rainbow Scrap Challenge . I have a lot of red scraps because I am currently working on 3 different red quilts; Broken Dishes, Aurifil BOM and 150 Canadian Women.
This week I used a few tiny red scraps on two different projects:
1) I have been sewing tiny double nine patch blocks for my Omigosh quilt for a long time. This week I tried my first alternate block which is a shoofly variation. It is so adorable and I really can't wait to make more of these. 

Here are 4 of the red blocks ready to add to the collection. I was really happy when I saw how these blocks are going to work together.
This is going to be such an epic Rainbow Scrap Challenge quilt!


2) I also sewed a little birthday cake for Temecula's 10th anniversary. They have shared so many wonderful projects over the years, and I wanted to be a part of their anniversary celebrations. So I made them a cake to become part of their signature quilt!
Click here for the pattern. You still have lots of time if you'd like to make a cake for them!
To see what other scrap quilters are making, hop over to the weekly link up.

Friday, March 10, 2017

Donation Quilt is Finished

My little quilting group finally finished their donation quilt for the 2017 Mennonite Relief Sale in May. We have been supporting this cause for over 10 years now and have raised over $2,000 from our collective quilting efforts. 
It's a long journey from picking a pattern, gathering scraps from the stashes of 5 very different quilters, sewing blocks, organizing a layout, sewing the quilt top together, quilting and binding it, and finally putting on the label.

The pattern is called "Warm Breeze" by Sarah Maxwell and Dolores Smith (finished size: 78" x 80"). It was published in McCalls Quick Quilts magazine and is available as a free download over at the Fons and Porter website - click here. This is a photo from when it was just a quilt top on the design wall. It's now a finished quilt sitting in a bag at the MCC office waiting to be auctioned in May. I was so nervous about getting it submitted before the deadline, that I forgot to take a photo of the quilting on the finished quilts. Hearts are hand quilted in the blue setting triangles.
We are already working on our next quilt for the 2018 auction. We have decided to start by compiling the blocks we collected on last year's July Shop Hop and see if we can make a quilt out of them.

Thursday, March 09, 2017

Are you a Blockhead?

I am a self confessed "blockhead" as defined by Carrie Nelson:
Blockheadnoun block·head \ˈbläk-ËŒhed\  A quilter who likes to make a wide variety of quilt blocks, who probably collects books filled with quilt blocks, who has lots of random quilt blocks but still wants to make more.
I have many varied collections of quilt blocks in my studio. Some of the blocks may become a finished quilt one day, but many may not. Is there a purpose to all of this block making? Yes! It keeps me sane and happy, and that is reason enough to start yet another block making project!
And when many of my favourite designers team up to make a scrappy quilt, which started on International Women's Day, of course I am all in!!
Click here to learn all about it. We're making only ONE block a week, from 5 pattern designers, for a total of 48 scrappy blocks. Let's do this thing!
Block #1 pattern is here.
My version of the block is in this bad photo taken late at night on my cell phone. It turned out okay in the end, but I cut the pieces wrong - twice! I read the top left instructions, which are for "layered patchwork" and use glue (*gasp*). That's not the instructions you want to follow. The traditional piecing instructions are on the top right. It took me a while to figure that out. And even when I had it figured out, I still used the top left instructions to cut it wrong... again. Lesson learned... no using a rotary cutter late at night!