I missed doing October's Free Motion Quilting Challenge because I built it up in my mind as "too hard"! When we face a big challenge, most of us tend to procrastinate and/or never try. I can't count the number of times I have heard quilters say "I wish I could free motion quilt". You can! But you have to be willing to put in the practice time!
 My plan is go back to October's lesson and spend more time on it over the Christmas holiday...practice and more practice!
Here is November's lesson with Sarah Vedeler which I finished on the last day of November! It is one of my all time favorite quilting designs - spirals! I used this design on my Dr. Seuss quilt, Disappearing 4 Patch, and the Kwik Scrappy Star quilt...to name a few.
My plan is go back to October's lesson and spend more time on it over the Christmas holiday...practice and more practice!
Here is November's lesson with Sarah Vedeler which I finished on the last day of November! It is one of my all time favorite quilting designs - spirals! I used this design on my Dr. Seuss quilt, Disappearing 4 Patch, and the Kwik Scrappy Star quilt...to name a few.
The hardest part of this lesson was to quilt the spirals in a straight line. On paper, the lines helped me to keep the swirls in a row.
But on the fabric, I tried to stitch a straight line of spirals on the diagonal of the block, and then swirled out! You can see at the top of the line, I forgot that my plan was to swirl in a line and made a couple of little swirls to the right, but I got right back in line!
I have really enjoyed the lessons that have been on the SewCalGal blog this year. Free lessons posted by award winning teachers... it doesn't get any better than that you quilters! If you haven't checked it out, hop over there and read or print out the lessons. There is only one more month left and the teacher is Patsy Thompson! I can't wait to see what she will teach....should be posted tomorrow.
I almost forgot to post my September block for the Free Motion Quilting Challenge. This was the hardest design for me so far. I know it shouldn't be, but I find it so difficult to quilt on a line... not at all "free" motion. It's feels much easier for me to make up a design as I go, instead of trying to quilt on a line.
I tried out the Golden Threads Quilting Paper to make the pattern this month. It is just like tissue paper and easy to trace your pattern through. Then I just pinned the traced pattern to the block and quilted on the lines.
The challenging part of using this product was removing it. It wasn't a terrible task, but did leave lots of tiny bits of paper in the quilting crevices that I tried to remove with tweezers.
So here's the finished block.
Not bad if you stand 10 or 12 feet away without your glasses on.
Up close...it's dismal!
Oh well. One of the benefits of this challenge is learning what you like to quilt and want to do more of, and discovering what you'll likely never do again!
This month the Free Motion Challenge was to stitch a design called "Jester's Hat" and the lesson was by Wendy Sheppard. The design looks so cute and I thought it would be fun.
But it was H A R D!!!
Part of my problem is that I love to quilt swirls, and my brain kept wanting to launch into what it enjoys/knows to do, instead of learning something new!
 I figured out during my many sketching attempts that I couldn't seem to fill in the space as easily as with other designs (like the heart shaped leaves or the loops and stars) and I did not seem to be able to keep the scale of the design consistent.
But I could draw it across the page one way and then come back, so I went with that as a plan!
Over to the machine...
Unfortunately my Brother sewing machine is broken and away at the "spa", so I had to use my back up Janome machine. The small bed is harder to quilt on and I couldn't find my extension table. Shheesh!
But the quilting stitch on this machine was okay so I went ahead and tried my best. I stitched across and back, kind of on a diagonal and it looked okay. There were a couple of crossovers, and unevenly spaced parts, but I give myself an 'A' for effort! And I am sure that the design would improve with more practice...or I could just blame the machine, but I'm sure it is operator error!!
To see other attempts at this month's challenge, hop over to SewCalGal.
I figured out during my many sketching attempts that I couldn't seem to fill in the space as easily as with other designs (like the heart shaped leaves or the loops and stars) and I did not seem to be able to keep the scale of the design consistent.
But I could draw it across the page one way and then come back, so I went with that as a plan!
Over to the machine...
Unfortunately my Brother sewing machine is broken and away at the "spa", so I had to use my back up Janome machine. The small bed is harder to quilt on and I couldn't find my extension table. Shheesh!
But the quilting stitch on this machine was okay so I went ahead and tried my best. I stitched across and back, kind of on a diagonal and it looked okay. There were a couple of crossovers, and unevenly spaced parts, but I give myself an 'A' for effort! And I am sure that the design would improve with more practice...or I could just blame the machine, but I'm sure it is operator error!!
To see other attempts at this month's challenge, hop over to SewCalGal.
July's Free Motion Quilting lesson was by Angela Walters and it was really a challenge for me this month! There is great information on SewCalGal's blog... if you are at all interested in machine quilting, you need to go and read these great (and free!) lessons. It was interesting to me that Angela learned to quilt from her husband's grandfather!
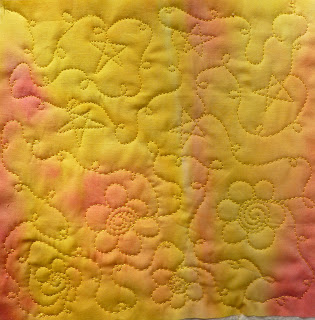
 First I painted a piece of fabric using Setacolor paints, and decided to make this month's design in the larger 8" x 16" size for my sampler. And then I found some Isacord thread that Leah Day recommended in her April lesson and was excited to try it out. I thought the colour contrasted well with my fabric, and hoped that would make it easier to stitch this design. I put my standard Aurifil in the bobbin, and this combination was perfect in my machine.
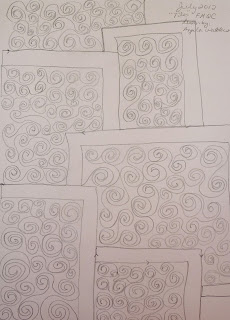 Next came lots of practice in the sketchbook, and a little bit of swearing!The design Angela taught is called "Tiles", and for me it was a tough lesson in learning how to plan your path in advance. I prefer to wonder around in a more intuitive way when I quilt rather than having a structured plan, so it was a challenge to make a plan and come out on the right side of each tile in order to start the next one...it's harder than it looks!
 Then I started on the quilt sandwich and it was still harder than it looks, but I was very happy that I didn't have any thread shredding, or snapping, and no thread tension issues at all. I had put some sparkly (opaque shimmer) paint on this piece of fabric, which you can't really see in the photo, but it made the fabric thick in some places, so I was a little nervous... but no needle fractures either!
It turned out okay. I wish my lines were straighter (again, it's harder than it looks to quilt a straight line with a free motion foot) and I wish I would have made my lines closer together. But it's done and I am pleased with meeting my goal for another month.
If you want to see how other quilters made this design, hop over to Sew Cal Gal's blog and scroll down to see the links for over 130 quilters!
Then I started on the quilt sandwich and it was still harder than it looks, but I was very happy that I didn't have any thread shredding, or snapping, and no thread tension issues at all. I had put some sparkly (opaque shimmer) paint on this piece of fabric, which you can't really see in the photo, but it made the fabric thick in some places, so I was a little nervous... but no needle fractures either!
It turned out okay. I wish my lines were straighter (again, it's harder than it looks to quilt a straight line with a free motion foot) and I wish I would have made my lines closer together. But it's done and I am pleased with meeting my goal for another month.
If you want to see how other quilters made this design, hop over to Sew Cal Gal's blog and scroll down to see the links for over 130 quilters!
 I have completed the June lesson for the Free Motion Quilting Challenge by Cindy Needham. It was a very extensive lesson, and took by far more time than the previous lessons...all great information, and opportunities to try new things. I enjoyed Cindy's ideas on learning how to work with the sound of your machine. First we were to practice three basic shapes - repetitive lines, circles and the S curve, and then try the "divide and conquer" exercise. Here is my sketch book practice. FUN! Okay...time to quilt it!
Then all of a sudden...panic set in.
I enjoyed the pencil work, but wasn't ready to start the quilting.
Next step... procrastinate! Got a cup of tea, decided to paint a new piece of fabric to quilt on, and tried a new resist technique using Elmer glue (from LuAnn's blog), which worked out really well.
I have completed the June lesson for the Free Motion Quilting Challenge by Cindy Needham. It was a very extensive lesson, and took by far more time than the previous lessons...all great information, and opportunities to try new things. I enjoyed Cindy's ideas on learning how to work with the sound of your machine. First we were to practice three basic shapes - repetitive lines, circles and the S curve, and then try the "divide and conquer" exercise. Here is my sketch book practice. FUN! Okay...time to quilt it!
Then all of a sudden...panic set in.
I enjoyed the pencil work, but wasn't ready to start the quilting.
Next step... procrastinate! Got a cup of tea, decided to paint a new piece of fabric to quilt on, and tried a new resist technique using Elmer glue (from LuAnn's blog), which worked out really well.
Then, I cleaned up my sewing tables, and sorted out my thread box, and picked out a few threads to try. How many purple threads does one quilter need?!?
Waited a few days for the painted fabric to dry. Did more pencil practice, had some more tea, and even resorted to trimming blocks for my Sweet Treats quilt!
Okay...what is going on?!?
Cindy calls this state "disequilibrium".
And then I realized that I didn't need to make my quilted piece exactly like my sketch...it's FREE motion, so just be FREE!!
 And just start!
Wait...I need more tea!
No! Just need to be brave and make one line.
And just start!
Wait...I need more tea!
No! Just need to be brave and make one line.
Good job!
Now what?!?!
Yikes!
Just quilt one section at a time. Divide and conquer!
Breathe. Quilt another section.
Relax.
Keep quilting.
 No going for tea!
Hours pass...
 And...voila!
Wow...that was fun!
Now what was all that procrastinating and fussing around about?!?
Here are my first six lessons. I am sad that I didn't use a darker thread on the yellow/orange block because I loved those designs but they can't be seen unless you get your nose right up them.
Lesson learned!
You can check out more than 100 posts from quilters who tried this lesson at SewCalGal...scroll way down to the bottom of that post to find the links.
I don't know where April went, but I didn't get the FWQ Challenge done last month and had some catching up to do.
April's tutorial was by Don Linn using a technique I haven't tried before, to make a quilting pattern from tulle.

I don't know if you can see my quilting pattern in this photo. I must admit that I did not enjoy the process of making this tulle pattern. Tulle and I don't get along and I think it's a tactile issue...I just don't like working with it.
I worked hard at following the lines as best as I could, and then branched out and did some fun free motion quilting to fill in the spaces - veins in the leaf shapes, a spiral in the center, some curly vines in the corners...that felt so much better to do free motion quilting versus following a line!
May FMQ challenge included a great tutorial by Leah Day. The videos are packed full of great information and are interesting to listen to, even if much of the info is a refresher course. She has such great energy about her and I enjoyed listening while I practiced with my pencil in my sketchbook, and while I was preparing my fabric and batting to start quilting. I have already done the railroad tracks design on a lap quilt, so this time I wanted to try quilting the "foundational line double stippling".
 I tried a bit of quilting with the feed dogs up, and then with the feed dogs down as Leah suggested, and I was definitely happier with them down...much more moveability and freedom of motion.
In this photo you can see the Janome quilting foot I am using on my Brother sewing machine...I just like it better than the one that came with my machine.
I tried a bit of quilting with the feed dogs up, and then with the feed dogs down as Leah suggested, and I was definitely happier with them down...much more moveability and freedom of motion.
In this photo you can see the Janome quilting foot I am using on my Brother sewing machine...I just like it better than the one that came with my machine.
 This month I quilted one of my hand painted fabrics (Setacolor paint with salt) that matches the flowers in my garden!
And I LOVED this quilting design! It is not my favorite in terms of how it looks, but it was so fun to quilt!
If you want to see the other months, here they are:
March
February
January
This month I quilted one of my hand painted fabrics (Setacolor paint with salt) that matches the flowers in my garden!
And I LOVED this quilting design! It is not my favorite in terms of how it looks, but it was so fun to quilt!
If you want to see the other months, here they are:
March
February
January
Have you signed up for the 2012 Free Motion Challenge? Each month there is a tutorial to learn new tips for machine quilting and the invitation to try some new designs. The teacher for the March lesson is Ann Fahl and her tutorial has a lot of good information for machine quilting in general.
 Ann recommended titanium needles and I thought I would give them a try on this month's block since I have heard so much about them. Supposedly these needles last "5 to 8 times longer" than regular needles, but I usually end up breaking my needles from quilting too fast! So, I will let you know how I do with the titanium ones.
 I tend to be mostly a cotton thread user, but I also decided to try some thread with a little bit of sparkle as Ann recommended, and tried this Sulky thread.
First you practice doodling the design on paper. This is a very light photo of my sketchbook, but maybe you can see that I focused on two of the designs...the loops and stars, and the spiral flowers.
I tend to be mostly a cotton thread user, but I also decided to try some thread with a little bit of sparkle as Ann recommended, and tried this Sulky thread.
First you practice doodling the design on paper. This is a very light photo of my sketchbook, but maybe you can see that I focused on two of the designs...the loops and stars, and the spiral flowers.
Here is my finished March block. I am using my hand painted fabrics (made using Setacolor paints) for this year long challenge and picked out a yellow fabric for this month. There were some skipped stitches at the top left corner, but then I slowed down and the stitches improved. It was really fun! I did the loops and stars at the top and then tried some spiral flowers on the bottom. When I saw how much I liked the designs, I wished I would have used more of a contrasting thread colour. I hope I remember this for next month!

I had to take a photo in the garden to put on my blog header since it's spring now, and the daffodils are already in full bloom here (way ahead of schedule this year!)
This month's practice reminded me how much I LOVE the spiral flowers! They are really fun to quilt and they look so cute. I have quilted them on a few quilts in the past - here in 2009 and here in 2008. To see my other 2 FMQC blocks - click here. To see other examples of this month's tutorial, hop over to SewCalGal's blog.
This is my February Free Motion Challenge block. I hesitate to post my block because I love feather quilting, and consider this to be my worst feather quilting block E V E R!
The teacher for this month's tutorial is Diane Gaudynski. It is a wonderful tutorial and I wanted to follow everything the way she does it, and I tried to do each part of the technique as she instructed.
I learned two things:
1) I cannot get the shape I like by feathering from the bottom to the top. I have always feathered from top to bottom, and maybe you can't teach an old dog new tricks?!?
2) I don't like the space between each plume. I like to retrace the edge of the previous plume. I like how it looks and I like how it feels to quilt. But I really tried to do it Diane's way just to see what it was like.
 I had some issues with the tension also. Here is one of the feathers from the back...see the clumps of thread?!? And it seems like there are bits of batting poking through? Maybe that is because I am using my hand painted fabric?
 I wasn't even happy with my paper practising in my notebook...yuck!
To show you (and remind myself!) that I do know how to quilt feathers, you can visit this old blog post from 2 years ago about a quilt that I feathered for a friend. Oh well, I know that I love feathering and it did make me want to get out a quilt and start feather quilting, so that's a good thing!
If you scroll to the end of Diane's tutorial, you can visit some of the more than 200 blog links of quilters who tried feather quilting this month and see how they made out.
I wasn't even happy with my paper practising in my notebook...yuck!
To show you (and remind myself!) that I do know how to quilt feathers, you can visit this old blog post from 2 years ago about a quilt that I feathered for a friend. Oh well, I know that I love feathering and it did make me want to get out a quilt and start feather quilting, so that's a good thing!
If you scroll to the end of Diane's tutorial, you can visit some of the more than 200 blog links of quilters who tried feather quilting this month and see how they made out.
Two blog entries in one day?!?
I forgot to write about my Free Motion Quilting Challenge block. I do believe that practice is the key to improving quilting skills, and this challenge seemed like a great motivator to try new designs and pick up tips from some amazing machine quilters.
 The January teacher is Francis Moore, and she demonstrated a design called "heart shaped leaf".
Pop over to her blog and read her Guidelines for quilting...love it!
I practiced on paper first as I always do, and enjoyed the "feel" of the design. I learned that it was tricky to change the direction of the leaf, but necessary to improve the look. And I learned I would have to force myself to remember the inside vein.
The January teacher is Francis Moore, and she demonstrated a design called "heart shaped leaf".
Pop over to her blog and read her Guidelines for quilting...love it!
I practiced on paper first as I always do, and enjoyed the "feel" of the design. I learned that it was tricky to change the direction of the leaf, but necessary to improve the look. And I learned I would have to force myself to remember the inside vein.
 Then I started on my quilt sandwich using some hand painted fabric that I have set aside for this challenge project.
It was really fun! Here is my finished sample. I just realized there is one errant loop in there...that's weird! There are some spaz-outs where the shape get a little wonky, but overall... I love it! I would totally use this design for a large quilt.
Go and check out the links to over 300 bloggers taking part in the challenge - click here.
Then I started on my quilt sandwich using some hand painted fabric that I have set aside for this challenge project.
It was really fun! Here is my finished sample. I just realized there is one errant loop in there...that's weird! There are some spaz-outs where the shape get a little wonky, but overall... I love it! I would totally use this design for a large quilt.
Go and check out the links to over 300 bloggers taking part in the challenge - click here.
 My plan is go back to October's lesson and spend more time on it over the Christmas holiday...practice and more practice!


