Pages

Thursday, October 28, 2010

UFO rewards

Are you following Pat Sloan's postings on finishing UFO's? I need all the help, encouragement and tips I can get! Pat asked us to pick a UFO and think of 3 rewards we could earn by finishing the UFO. Here is my UFO.

This is #7 Garden Lattice on my UFO wish list (on the right hand side of my blog). I pieced the top in the spring of 2006 and I now have everything ready...the quilt top (WITH borders), the backing, the binding (all prepared) and the batting.
My 3 rewards are:
1) Halloween Lindt chocolate balls (of course)
2) I will take a day off work and go to the Shop Hop (to buy more fabric to start more UFO's!)
3) the satisfaction of having a finished UFO project to brag about  take to my UFO meeting next week.
Can I do it?
Well, I'm totally motivated now...we shall see!

Wednesday, October 27, 2010

Using the scraps

I have been  playing with  organizing my scraps. For some bizarre reason I am obsessed with becoming more efficient and I want to be able to easily use my scraps.
And how can you pick what you want to use if you can't see what you have?!?
So my friend Barb found me these great containers to sort scraps into.
Okay now scraps...jump in there and sort yourselves into colour groupings!!
Do I have to do everything?!? LOL

Remember this post from August, when I was coincidentally doing exactly the same thing as today!?!?   I was inspired to sew up a scrappy pinwheel block from the Friday Block Party pattern of the week. I think I made that block because I was bored to death with the sorting and pressing scraps job...and I wanted to get to the fun/sewing part, which is way more fun!
And then in September I sorted and cut more 1 1/2" scraps for a prairie point border - click here to see them.
Well, now the 14" mini quilt is finished (minus a hanging sleeve)!
The pinwheels have 71 scraps, and the prairie point borders have 56 scraps, for a grand total of 127 little bits used up from the scrap treasury!

Monday, October 25, 2010

Design Wall Monday #39

Continuing with my theme of scraps from yesterday's post,  this is the scrap quilt that my little quilt group ("the Sew 'n Sews") has been working on for the Mennonite Relief sale and quilt auction in the spring.

This quilt was originally inspired by "Crazy Mom's" quilt on this blog post. We thought it would be a great design that could accommodate 4 different 1/4" seam measurements :)

And we were right...the rows sewed together quite well with a minimum of fudging and stretching!

This quilt top is already bigger than my design wall (you can see the corners flopping over at the top) and we are now deciding if we want to add borders to it or not.
It is a quite an interesting quilt to look at, containing the bright scraps from the stashes of 4 quite divergent stashes. Some of the blocks are almost like an "I Spy" quilt with so many things that a child would enjoy looking at...a castle, fairies, cats, etc.
It all started with a little starter kit that I put together...kind of like a quilty friendship dough.
I made up these fabrics kit to start from, and each quilter added their own ingredients/scraps from their stash.
Any ideas about the borders???

Sunday, October 24, 2010

Scrappy Sunday

I haven't been sewing much this week, since I have been spending my quilting moments organizing and cutting scraps.  I do love my scraps but haven't felt inspired to work with them as often as I could.
This is a Tshirt that a friend bought me for my birthday...I do like to think I am the "Scrap Queen" but I sure would like to have them more accessible.
First of all, if you want to be totally amazed with fabric organization, go check out Teresa's system posted on Stash Manicure - click here (and then come back here with your jaw hanging open!)
I am also inspired by the scraps sew along on this blog and want to get my scrap system organized into a more useable system (not even in the same ballpark as Teresa's system, but better than it has been) so I can turn my scrap gems into quilts.


One job I did was to cut up the rest of my dotty scraps for this project - into 1 1/2" squares and 1 1/2" x 2 1/2" rectangles. That was a fiddley and boring task but I'm now organized to finish these blocks, which I have been sewing as a leaders/enders project.


Then I dug around in one of the scrap piles and pulled out old chunks and bits, and cut them into 2 1/2" strips.
While doing this,  I was pondering why my old junk scraps weren't inspiring me to actually sew them, and why they look so ugly compared to other people's scraps (go look at the great scraps at Freda's Hive) and what I could do about that.
First I decided to cut them into more interesting shapes...half hexagons appealed to me.

Then I decided that I needed to add in some spice...some pretty new fabrics, and I found just the ingredient...a scrap bag from Hancock's that my friend Jake brought back from Paducah in the spring. It was full of strips from Kate Spain's fabric line Fandango. I cut them into 2 1/2" strips and that was when I started to LOVE this project! I have no idea how it will turn out, but it is now more appealing to find out!


I also got into my bright scraps bin and remembered how much I love the primary bright colours.

I ironed some of those, sorted them into a small bits container and the larger pieces were cut into border blocks for the mystery BOM at my guild.


There will be 40 blocks in the border and I have a good start on organizing those blocks.

So now I am feeling more organized and feeling the scrap love again!
I'm so pumped to get to the sewing machine and see how these projects turn out.

Tuesday, October 19, 2010

Finished Stashbuster Quilt


This is the photo of my finished Stashbuster quilt.

I pieced the blocks together in July - click here to read more about that. It was a quick and fun project to make and would be perfect if you were looking for an easy Christmas gift to make! (If you need to get the pattern for this quilt - click here.)


For the machine quilting, I had planned to try an allover "E" design like Paula did in one of her quilts - click here.  But when it came the moment to put the quilt under the needle, this is what happened!
In Diane Gaudynski's reference book, she calls this design "bouncing bananas" and whereas she seems to join the banana ends and creates a very tight, organized looking design, these banana bunches are definately out of control! But very fun to quilt!
Then I wanted to make a bias binding using my 2 remaining co-ordinating fat quarters and consulted this website to remind me how to do this since it had been a while (I always make a double fold binding).  This is what it was looking like, but somehow (and I'm sure it's magic) it turned into a lovely binding.

Then I tried to use Bonnie's method of joining the ends and that's when the magic ended, which resulted in this binding mess...ooops!

And what's on the back... the leftover pieces that didn't get used on the front! All the leaves are falling from our trees this week, and I couldn't resist a photo op in the backyard!


Did you notice the label in the bottom corner?
That means the quilt is truly "finished"!

I liked this quilt so much that I asked the Buttonberry girls if I could teach this quilt pattern at the senior's centre and they generously agreed to let me do this.

Here are the ladies with their projects:
This was the perfect beginner's project and they made such a great job on each quilt. Many of these new quilters had to overcome personal and/or health challenges to be in this class and I was so inspired by their efforts. Thank you again to Emma and Lisa over at Buttonberry for the use of this fun pattern!

Monday, October 18, 2010

Design Wall Monday #38

Not a lot of sewing got done around here yesterday, but there were a few minutes to play at the design wall with my blocks from this class with Bonnie Hunter. The pattern is called "Blue Ridge Beauty" but I'm calling my quilt "Plaid Beauty" and using up all my old homespuns. Some of the fabrics were purchased at a store called Miller's, which has been closed for at least 10 years!!
This is my "no brainer" project that I pull out to work on just to relax. I have a lot of the units (4 patches and HST's) made up and just enjoy sewing the blocks together in a totally random way.
How big will the quilt be? I don't know...I will keep making blocks until I run out of my collection of old plaids!

This is layout A...the first arrangement I tried on the day of the class.

Notice the tiny 4 patch blocks I made to use up even the smallest of my plaid scraps?! So cute!


This is layout B... making the HST's form a diagonal line.


Then I tried a double diagonal layout with the HST blocks which gives a stronger diagonal. This is layout C.


This is the layout that Bonnie has on her website photo and in her book.
Would you call this a "barn raising" design if these were log cabin blocks??
Today I'm calling it layout D.


And here is another one the I accidentally discovered which look a bit like flying geese!
This is layout E.

So which one is your favorite?
Please leave me a comment and vote for the layout that you think works best with these blocks.

And then you can go visit Judy's blog and check out the other design walls that are posted for our enjoyment!

Sunday, October 17, 2010

Quilty adventures

It is another fabulous fall day here...sunny and crisp, with beautiful colours to see. I will be clearing out my garden today. We have had a couple of good frosts this week so everything is wilted.  I plan to shred the remaining zucchini, and then chop and blanch the rest of the carrots to put in the freezer.
I had a very busy week with quilting adventures to tell you about...
I did a trunk show of some of my quilts for the Erin quilters. It was great fun to be with them again and to see some old friends...here they are:

The monthly mini quilters have started meeting again and yesterday I bribed them to bring back the crossed canoe projects that we worked on last May. (To see my two minis click here and here.)  If they brought a finished (and by "finished" I meant that the quilt had to be quilted, bound and labelled!) project, their name would go in a draw for this Moda charm pack "Makin' New Friends". 

There were 3 fabulous canoe minis (from Diane, Barb and Nancy) that made an appearance and here they are:
Isn't it amazing how they are all so different? I could guess which quilter made each of these quilts based on knowing their fabric preferences! 
The winner of the charm pack draw is Diane!

Another highlight of the class yesterday was the fall gift that Susan made for everyone...look at these great pumpkins she gave us! To see the pattern that she found on Carrie's blog during the Fall-o-ween Blog Hop - click here. Aren't they fun?!?

And the winner of my Fall Into Fall Quilt Blogger giveaway is Marit! Isn't blogging such a fabulous opportunity to interact with quilters around the globe?!? My Valentine's Day giveaway went to the Netherlands and my Fall giveaway is going to Norway...how fun is that?!?! In addition, I also had to send a Charm Pack to Paula in Wisconsin because she left a comment that she NEEDED that charm pack to finish the border on a quilt, so how could I resist that?!?
I am also excited to be the winner of one of the Fall Into Fall Quilt Blog draws - I am the lucky winner of a baby quilt kit from Linda at Stray Stitches! Go check out her blog because she is having another great draw for 2 1/2 yards of leaf fabric - click here.
I'm heading back to the garden now. If there are any extra minutes left at the end of the day, I'll be sewing a few more blocks for my plaid beauty so I can post some photos tomorrow for design wall monday.

Friday, October 15, 2010

Machine Quilting

The fall weather continues to be glorious! This is a photo from an afternoon walk with my dog...aren't the colours amazing?!?


Today is the last day to enter the Fall Into Fall Quilt Bloggers Giveaway. If you haven't entered yet, click here and put your name in for my draw. I will be picking the winner's name tonight...check my blog tomorrow night to see who wins!


For the first time ever, I entered some of my quilts in a Fall Fair and found out that I won a couple of ribbons!  This quilt won the machine quilting ribbon and I have learned that it will "go on to district" (whatever that means!)  so I won't get the quilt back for a while. Maybe it was the only quilt entered in this category?!? LOL
You can read more about the details of the machine quilting - click here.


Winning some ribbons and seeing all the quilts was really fun, but I have to admit that this was my favorite part of the fair!


Today I taught a machine quilting class at Triangle Sewing and the students were fearless with their machines! Here they are showing some of their quilted sandwiches. They practised quilting feathers similar to the ones I quilted on the wallhanging on the right of the photo. (To read more about the quilting - click here.)

Monday, October 11, 2010

Happy Thanksgiving!


It is Thanksgiving today in Canada and I will be making the traditional turkey dinner. It has been absolutely glorious weather this weekend...warm and sunny every day. This is one of the beautiful trees we saw on our Saturday walk.


My extended family celebrated together yesterday and we took the 10 kids to the apple farm. We picked a lot of apples and I plan to make apple pie and Judy's Caramel Apple Jam.


We also went on a hayride and walked the corn maze...we had a great day!


In addition to today being Thanksgiving, it is also Design Wall Monday over at Judy's blog. This is what was is proudly being displayed on my design wall...block #7 of my "Journey of A Quilter" project.

I finished block #6 last summer, and have been slowly working on the above block for over a year...I have no idea why these blocks are taking me so long, except that I have started many many other quilts since then and I am enjoying the journey!!
I also have block #8 pieced and just have to trace the embroidery designs on the empty white spaces, and then I can get the hand stitching started on this one.
And then there will be only 1 more block to make...woohoo!
Happy Thanksgiving to my Canadian blog readers!

Saturday, October 09, 2010

Long knitting post

What a crazy busy week! I haven't had much time to sit at the computer this week, or to do any quilting. This is how the tree across the road looks today...the colours are wonderful and I plan to spend the whole weekend either cooking or being outside :)
I still haven't visited even half of the wonderful giveaway blogs for the Fall into fall quilt bloggers giveaway hosted by Debi. If you haven't signed up for my giveaway, click here to do that...you have until October 15th.
Before preparations begin at my house today for the Thanksgiving meal with my family, I'm having a cup of tea and writing a loooong blog post about a knitting project...yep, knitting!
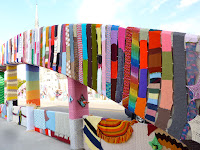
In June I wrote a post about my home town trying to set a guinness world record - click here to read about it,  and I must admit that I have been tempted to try knitting socks. Judy and Mary have been giving instruction tips and I love the look of their socks. But what is mostly inspiring me is the "Knit the Bridge" art project in my home town.
This photo on the left shows the knitted pieces that were collected at the Centre for the Arts over the summer that were used to dress up the downtown bridge, a project co-ordinated by Artist in Residence Sue Sturdy.
Here is a bad photo of me knitting a few rows on a group project that resided for the summer in a basket at a cafe overlooking the naked bridge. Anyone could come and knit a few rows while they enjoyed their tea or coffee and wondered what the bridge would look like when it was covered in knitting.

                               And this is what the bridge looked like... it was a sight to behold!


The shadows in my photographs are long due to the early hour of my visit... I got up early before I went to work and drove over to the bridge because I almost missed seeing it before it was dismantled!


To see a short amateur video click here...I just love the line the videographer says before the end of the video..."Stuff like this, makes people happy"!
Can you imagine all the hours of work that went into this project? From the knitting of the pieces, the organizing of the wrapping the bridge, the dismantling, then washing and reconstructing the pieces into blankets for charity donation. What an amazing project!
The only thing that stops me from getting out my knitting needles is that I love quilting so much and have so many quilted projects I want to work on!


Monday, October 04, 2010

Design Wall Monday #37

There isn't much on my design wall at the moment. I am "in between" projects since finishing the wedding quilt yesterday. I recognize this feeling that occurs after a big push to finish a quilt and being obsessed by it (especially with a deadline), and then wondering around not knowing what to do with myself next. I usually end up cleaning and putting things away (always a good thing!) until I settle on the next project to work on.
This is what was on my design wall the last time I looked...pumpkins that didn't go into my giveaway wallhanging - click here to see my "Fall into Fall" giveaway (and enter the draw if you haven't yet) and click here to get to the list of quilting blogs hosting fall giveaways.
Which one of these blocks is not like the others?!? LOL! Today there will be some reconstructive surgery happening on the "unique" block to make it more "pumpkin looking".
And now that I have my orange scraps out to play with, I might make a few more blocks!

Wedding Quilt

Are you wondering if I finished the quilt in time for the wedding?!?
Yes...I pulled it out of the dryer just before we had to leave, and I attached the label (which I almost forgot) on the way to the church! I had pieced the blocks for this quilt at retreat in February and got the blocks sewn together in March.
It is made using Bonnie Hunter's free pattern called "Scrappy Trips Around the World". Not only is it a great stashbuster quilt pattern, but it was fun to sew.


I did wavy line quilting on the diagonals to emphasize the trip around the world design and it went fairly quickly. No problems with the quilting until I switched to Presencia thread to quilt the names of the wedding party in the border...then I had issues!


This is as far as I got quilting "Chad" before the thread broke...so I took that quilting out and put my Aurifil thread back in the machine...smooth as butter! I love that stuff!


I quilted the names of the wedding party attendants on the side borders, and the names of the bride and groom on both ends of the quilt. Then I stippled around any remaining spaces in the borders, and puts some hearts in the corners just for fun!


Here is the finished quilt being quickly held up by my son before I jumped in the car to drive to the wedding!


And here is a photo of the bride (my husband's cousin) and groom as they were getting ready to leave for their honeymoon. Although the weather was not good for their celebration (cold temperatures and lots of rain) I think they had a great day...they look very happy!