Pages

Tuesday, December 26, 2006

Half of the celebrations are over

We had a wonderful Christmas day with my side of the family. Between trying to balance all the in-law families and the numerous moves of my little sister, we just haven't been able to gather together for Christmas for 11 years. At our last Christmas together there were only 2 grandchildren and this Christmas there were 10! So it was a much louder and very frenetic gathering, and it seemed that all we did was prepare food, do dishes, clean up and then start again with preparing more food! Mom and Dad, who are almost 70 years old, did a great job with cooking the turkey dinner and tolerating the chaos!
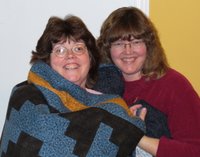
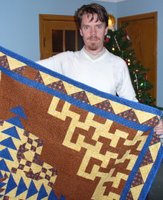
On the left is my brother with his new quilt, and on the right is my sister and I with her new quilt. It was very fun giving these quilts away and knowing they will be well used.
Also this year, I made a photo calendar for each of my nieces and nephews. I went through my collection of photographs and selected 12 photos for each of the calendars. I also made calendars for my 2 step-nephews, one for Mom and Dad, 4 for the nieces and nephews on my husband's side of the family and 3 for friends of mine. Altogether I made 20 calendars, using 240 photos...which gives you a sense of my collection of photographs!


This is the one photo that was in each of the calendars made for my relatives- it is of the grandchildren at our annual family camping trip. When the calendars were opened, the children spent a long time looking through their own, and then looking through the calendars of the other cousins. I was very happy that they enjoyed them so much...lots of happy memories!

Now we are preparing for the celebrations with my husband's side of the family. They have created a tradition where we all gather somewhere near the half way mark of where everyone is living, and this year it is Syracuse, New York. We travel to a carefully selected location, where we have booked four adjoining rooms and spend 3 days, 2 nights visiting together. There was only one year that the weather was terrible/snowy and impossible to drive in, and this year it will be mild and green. One of the many benefits is that no one has to do any cooking... and the grandchildren (many of whom are all grown up now) have a great time in the swimming pool, and enjoying other activities at the inn/hotel. It is our time for relaxing and catching up with each other's lives. The only thing left that I have to finish is to bake a big batch of shortbread cookies, using my grandmother's recipe. My nieces have already called twice to make sure that I am baking...last year I ran out of time and showed up without the cookies, and haven't heard the end of it!! I also have to check on the internet to find out what quilting stores I might be able to visit while I'm in the area!


Sunday, December 24, 2006

Merry Christmas

Everything is ready for Christmas! This has never happened to me before that I am actually able to relax on Christmas Eve. These are the pillows I made for my daughter and I had a terrible time with that pink fabric. I bought enough to make two pillows with it, but after struggling so much in sewing the first one, the rest of that fabric is going in the garbage. There are tiny bits of pink fuzz all over my sewing room.

Here is my Christmas thought by Agnes M. Pharo:
"Christmas....is tenderness for the past, courage for the present, and hope for the future. It is a fervent wish that every cup may overflow with blessings rich and eternal, and that every path may lead to Peace."
Merry Christmas!

Saturday, December 23, 2006

Right on schedule

I have finished all my Christmas quilting, which means no late night binding for me on Christmas Eve! The quilt on the left is for my sister and her family. It is a Deb Kaffunger design and made of flannel (top and backing). I quilted it myself and it was one heavy and uncooperative pile to push through my sewing machine! I did very simple, straight quilting in the ditch, diagonal lines across the dark chains, and a bit of free motion quilting in the gold blocks.
The quilt on the right is for my brother and is also all flannel. It is another one of Deb Kaffunger's design and a very heavy quilt. (I think I have had my fill of flannel quilts for a while!!!) It was quilted for me by Lynne Tompkins and was hanging in our guild quilt show this past April. It has two errors in the block placements, which I didn't realize until it was quilted, so that's the way it is staying....which is ironic, because my family teases me about being "directionally impaired" and the quilt design is called "Directions"!
The third quilt on the left is for my little sister and her family, and is not flannel! Most of the fabric is from the "Atlantis" line of fabric by Makower. This design, called "Becky's Wisdom" was taught at the 2005 guild retreat by Vivienne Dawney and I quilted it at a retreat in 2006. The hardest part of this quilt was sewing the curved borders, but once you caught on to the technique, it went together quickly. I did some fun free motion quilting on this one, and had a great time with it...here is a close up.
Each of these quilts is a twin size bed quilt, which some people might be surprised about, since I am more known for making miniature quilts. However, I just love the thought that the special people in my life are cuddling up in quilts that I have made especially for them. With each of these quilts, I knew who I was making them for, and each stitch was taken with loving thoughts of them and thankfulness for my relationship with them. I can't wait for Christmas to give these gifts to my brother and sisters!

Wednesday, December 20, 2006

Westfield Heritage Village

On the weekend we took the children to Westfield Heritage Christmas. Everything was decorated as if the pioneer town was preparing for Christmas. In each of the old buildings there were people dressed up and talking to the visitors. Many professions were represented...doctors, welders, tailors, farmers, spinners, weavers, and even train conductors, but there were NO quilters to be seen! There were a few antique quilts on some of the beds, like this one, but no one was talking about how the pioneer women actually made the bedding for the family. I think that next year I should volunteer to be the quilter at the Westfield Village! I don't know if I could quilt by candlelight, but I sure could talk about quilting!
And talking about quilting....I taught my last quilt class of 2006 this week! These are the mini quilts that the students brought back to show us from last month's class. The two quilts on the right are still deciding what borders they would like. What a creative group of women they are...each quilter has added her own unique touches to these quilts!
I was busy this weekend quilting my last Christmas quilt. The only job left is to put the binding on, so I am close to being ready! I will post photos of my sibling quilts later in the week before I wrap them up. Now I just have to finish shopping, wrapping, baking, and have decided that I don't have enough time left for writing Christmas cards, so that's off my list!

Friday, December 15, 2006

Pillowcase Pattern

At the guild meeting this week I did a short demo on making pillowcases for quick and easy gifts. Here is a photo of me in the year 2000 when I made these pillowcases for all my nieces and nephews, and my children. I selected fabrics according to their ages and interests (soccer for the older boys, trains for the younger boys, little animals for the toddler boys, etc). They were well used and appreciated gifts, although the Christmas ones that I made for my children are getting a little worn out!
I used a basic pattern that was posted on the Hoffman Fabrics website at that time (it's long gone now). Here are the pieces to cut if you want to sew up a pillowcase for a standard size pillow:
1) CUT 1 pillowcase fabric - 28” x 44”
Fold in half right sides together and sew two sides (1/4” seam).
2) CUT 1 accent fabric - 2 1/2" x 44”
Press in half lengthways with wrong sides together.
3) CUT 1 border fabric - 9 1/2” x 44”
Press in half lengthways with wrong sides together.
4) Sew the accent and border strips together, lining up the raw edges.
5) Sew the accent and border strips to the pillowcase fabric, lining up the raw edges.
6) Turn inside out and press.
If you have a serger, it is best to serge all edges, however I don't have one, so I just sewed the regular 1/4" seam and these pillowcases are still holding together!
Also, if you have a fancy embroidery machine, you can personalize the borders with the name of the child/person for whom you are making the pillowcase.

Thursday, December 14, 2006

Getting "carried away"!!!


How many beads can I buy with $50?? A handful!
That's right...I like the expensive ones! I went to my local bead store today to get a few more beads for a challenge quilt I must finish before Saturday, and got a little carried away!!

And speaking of getting carried away...my creative children spent an evening with my parents and made this beautiful gingerbread house. They spent a long time making everything just right. My son added two special touches...he placed a family of paperdolls on the inside of the house for some reason, and decided the house needed a "welcome" sign. While he worked on those paper creations, my daughter worked on the actual house construction. Reportedly a great time was had by both the grandparents and the grandchildren!
Yesterday when I came home from work, guess what those lovely children were doing? This is what the house looks like now! They had eaten the candy off the house and ripped off half of the roof in the process! "What are you doing?" I ask (I may have screeched?), watching them as they continue to break off and eat the remaining candy. They didn't even act guilty!! "You didn't tell us we couldn't eat the candy"!
So now what am I supposed to do with this broken down gingerbread carcass??? Should I reconstruct with a glue gun and whip up more icing to add more candy?!?!

Sunday, December 10, 2006

From the Ridiculous to the Sublime!

I am madly trying to finish quilts for Christmas, the same as most quilters I know! Every year I say I won't do this again (leave too much sewing until the last minute and stress myself out) but apparently I like it, because I am doing it again! I would love to be working on my newest mini quilt - some of the bits and pieces are sitting here on my 6" ruler. This is relaxing for me and each day before I go to bed I sew a few more pieces.
But mostly I am working on a bed size quilt for one of my siblings for Christmas. It's the first time in many years that we will be all be together on Christmas Day, so I wanted to make a quilt for each family. I have two of the three quilts finished...the last one is all flannel and hard work to quilt on my small sewing machine. I must force myself to work on that first, and then bribe myself with a little time sewing my mini quilt. I will post photos of my sibling quilts when they are all ready to be wrapped.
And then I just have to finish making something for my 12 nieces and nephews...asking myself again, "why do I insist on hand made gifts every year"? But on Christmas day when they have unwrapped PILES of toys and clothes, I am always happy with my decision to make them something handmade, unique and unforgettable.
And then I have to prepare something for a guild demo on Tuesday.
"Am I done my Christmas shopping" you ask? I haven't even started it yet!
Here are some of the other Christmas quilts around my house. These two quilts are from a round robin group that was together for many years. There were 2 quilters from Manitoba, and 5 of us from Ontario in the group and for each project we had a different theme. On the left is a row round robin that I finished in 2003. The rows are 20" long and for that project I asked for Christmas themed blocks. The quilt on the right was from our strippy round robin in 2000 when there were 6 of us in the group. For each project we had to make a vertical row 60" long, and I asked for star blocks. The second column from the left was my row and it was made up of blocks from a star making workshop I took from Andrea Curtis many years ago. This was in my UFO pile until this year when I finally sewed the rows together and quilted it. So this is our first Christmas enjoying this wonderful quilt. Thanks to my quilting friends (Gail, Carol, Shelley, Linda, Carla, and Cathy) for contributing to many of the great quilts I have in my house!

Wednesday, December 06, 2006

Christmas Preparations


On Sunday was our much anticipated, annual family outing to find our Christmas tree. Although this year was colder than usual, it was just as fun! We walked through the fields of trees in search of our perfect Christmas tree! Then we (I use the "royal" we here, actually my husband does all the work and I take pictures!) carry the tree to the farm office where they put it in a mesh bag and then we stuff it in our car trunk to bring it home. Every year we say it is the most beautiful tree and this year is no exception! Here is my husband relaxing in his Lazy Boy chair, by our decorated tree, covered in one of the first quilts I made from start to finish by myself. It is getting very worn and thin, but is still holding up. All of the 93 hearts are hand appliqued. I machine quilted in a simple grid horizontally and vertically, and then diagonally across the quarter square triangle blocks. I gave it to him many years ago as a quilt top, and after Christmas he helped me baste it on the dining room floor. That was my first and only time hand basting a quilt on a floor! And you can also see my wonderful dog Molly,who cuddles up with whoever has a quilt!
Our tree is always decorated in the tradition of my husband's family, with chocolate ornaments, straw stars, and crocheted stars made by hand by his Mom. When my children were younger we used to make popcorn strings for the tree, but now they think it is a waste of popcorn and would rather eat it than string it!

Sunday, December 03, 2006

More Student Quilts

I had another busy teaching day yesterday. We had a slow start to the class because the students had to make their way through the crowds that came to see the Christmas parade, which started at the same time as the class...it was a very busy little town!
One of the students from my "Easy New York Beauty" class in October (see October 26th blog) brought in her finished miniature quilt to show me...isn't it wonderful? This was made by Sheila, from a bag of blue and white scraps she had purchased. I think she used the 2.5" block size, so the
little quilt is approx. 5" x 7.5". Besides doing a great job with the tiny piecing, she also was very creative with her embellishments, and this quilt just sparkles!
The morning students were finishing up their fall miniature projects with leaf blocks... they turned out great! Each person added their own unique touches, Annie's top was hand quilted, Sylvia's had a unique border treatment, Janet's had a tiny free floating folded border (some people call it flat piping) and Cindy was still thinking about her border, but had finished all the blocks. The tricky thing about this project was fabric selection, and mastering those small Half Square Triangle blocks, and they did great work! Sorry the photo didn't turn out well enough to post here.
The afternoon class worked on embellishing their painted pieces which they had quilted over the last month. Some were machine quilted and some were quilted by hand. There was a lot of creativity floating around in that room! Some quilters had no experience in painting, and some were beginner quilters, so they really did amazing work!

Sunday, November 26, 2006

Christmas Decorations

Don't you just love getting your decorations out of storage? This weekend we had a family get-together so we decided to help Mom and Dad decorate their Christmas tree. This is the angel that has overseen every family Christmas for the last 47 years! Everyone would tell you that she is one of my Dad's favorite possessions! No one is allowed to touch the angel, and she is lovingly placed at the top of the tree every year by Mom or Dad. The grandchildren helped place all the other ornaments, and we found some of the ornaments I have made in previous years. In fact, there was an old felt drum that I made in grade 6 ("throw that ridiculous thing in the garbage" I say to Mom every year, but she still put it on the tree again this year), and here is one of the quilted ornaments I made 10 years ago for everyone in my family. It is a tradition now that I make something each year for all my neices and nephews...I still haven't decided on what to make this year...and now I have less than a month to figure it out!
After helping to decorate Mom and Dad's tree, I came home and started to dig out some of my old Christmas mini quilts to hang up. This is one of my favorites...it is about 8" square and was a fun project. I remember how much I enjoyed couching the garland on the quilted trees I made that year! If I were going to make these again, I would add many more ornaments to the tree and lots of beads! Oh...and I'd make sure the floor piece was not so wobbly!
You can find the full size block pattern here at Quiltaholics.

Tuesday, November 21, 2006

Monthly Miniature Class


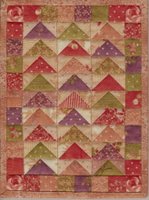
Today I taught a miniature quiltmaking class and this was the project for November. It is a very small (approx. 7" x 9") paper pieced quilt which I call "Flocks of Geese". I made the entire quilt using one of the Moda Swatch packs (excluding the binding). One of my favorite tips (which I learned from a Carol Doak book) is to use the Scotch brand "Magic Removable Tape" if you should happen to cut your pattern by accident. You can sew through the tape, and when your quilt top is pieced, the tape easily peels off from the paper.

Here is the pumpkin patch that the class pieced in October ...mini "Jack-o-Lanterns". The top three were made by Barb, the middle larger quilts were made by Lana, the bottom left quilt is Marj's and the bottom right quilt is Marion's. They all have the same centre pumpkin block, which measures 5" x 6" and then each quilter created different borders.
Check out my blog next month to see their finished "Flocks of Geese" quilts! Each student brought such beautiful fabrics in a variety of colours, so I am excited to see how they turn out!

Monday, November 20, 2006

Trip to Frankenmuth

This past weekend I went on a mini vacation with my sisters and my Mom. For the past few years we have spent our November weekend getaway in Stratford, spending Saturday night at "The Quilt" auction, but the admission price has doubled and it would've cost us $200 just to get in , so this year we decided to go somewhere new.
We chose Frankenmuth, Michigan and had a wonderful time together. We spent some time shopping, but mostly we visited and laughed, and talked until the wee hours of the morning. We don't see each other very often since my sister moved to the US, so we had a lot of time to make up for! I had a great time with my "womenfolk", but didn't get nearly enough sleep for all the driving I had to do!
One of the great stores we found is called "Bead Haven". No one else in my family is interested in quilting or beading, so I thought I wouldn't be able to spend much time in the store. But my youngest sister fell in love with the idea of a bracelet of her children's names, and spent even longer than I did in the store! Here is Mom and my sisters selecting some of the stones and beads for the bracelet, right before I got in trouble from the staff for taking photos in the store....oops! Anyway, I purchased some beautiful beads for a project I am working on, and if I had an unlimited budget, I could've spent a big pile of money there! They have three large rooms filled with an incredible variety of beads. They also offer classes, in a lovely classroom setting with large well-lit tables. For the people who don't love bead shopping and have to wait for the shoppers, they have a sitting area with large comfy chairs. My sister was very happy with the beautiful bracelet she made for her birthday...a little gift from herself, to herself, and a momento of our girls weekend together!
The staff did allow me to take this photo (on the left) of a sparkling quartz that was just remarkable...it was probably about 12" across the base and 10" high. And here is a photo of us outside the store...it was cold and windy in Michigan. Can you see my sister's bracelet?!?!?

Wednesday, November 15, 2006

Guild Meeting

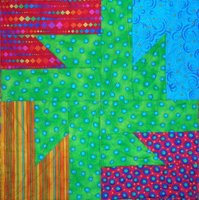
I had too many things to remember for the guild meeting last night! I had myself all stressed out trying to get organized. I had to put out the historical records (I am the guild photographer/historian) which meant putting the finishing touches on last year's album, and the quilt show album. And I wanted to show two quilts at "Show and Share" so the bindings had to be finished. This is a quilt for one of my energetic nephews. The pattern is called "Tesselating Stars" and is by Cindy Thury Smith. It took quite a while to finish (okay...it was just over a year, which is not long by my UFO standards!!) and it was a real learning experience in terms of color planning. I enjoyed the block construction, but it took many trips back and forth between the design wall and the sewing machine. I had a great time with the machine quilting and made a fun design in the middle of each star....I don't know if you can see the quilting on this close up shot of one of the blocks or not? The binding is one of my favorite fabrics....a bright and happy yellow and green stripe. And the best news is that Cindy (the pattern designer) has generously given me permission to teach a "Tesselating Stars" class this winter!
The second quilt is one of Debby Kaffunger's designs called "Diamond Waterfall". I was originally sewing it for a charity quilt, but my daughter loved it so much that I made it larger, and then I had to spend way too much time shopping for more fabric to finish it! However, I was successful in finding more fabric to match and it is finished now, in plenty of time for Christmas. I had trouble initially choosing my quilting designs and still haven't quilted anything in the pink areas. I haven't decided if it is finished yet or not, however the binding is on now, so I'm guessing it's done! (I have written more about these two quilts in October postings)
So between lugging the two large photo albums, these two quilts, my library books to return, my finished blocks of the month for charity quilts, and my camera equipment...I was loaded down. And guess what I forgot? My nametag! Why can't I just keep it in a place where I will always take it along?!?!?


Sunday, November 12, 2006

Progress on my Winter Quilt

For the past 3 years I have been working on a winter quilt for my dining room wall. I already have a Christmas wallhanging and a spring looking quilt, plus my Great Canadian Fall quilt which is hanging there today. This quilt was made from a row round robin with Canadian quilters I met on the internet, and is about 55" square. I finally quilted it last fall but am seeing spaces that could use a little more quilting every time I look at it!

I have been collecting blocks for my winter quilt which I would hang up in January (if it was done!) for 4 years now. I have received many wonderful blue and white blocks in these exchanges in which I have participated. I have accumulated more than 30 blocks for this quilt, but the problem is that they are all different sizes and shapes and I cannot for the life of me figure out how to put them all together in one quilt! I have played around with EQ5 and designed several quilts and am not happy with anything so far. Finally I admitted to myself that if I continue on in this manner, the quilt will never be finished. So I just have to start somewhere and stop thinking about it. I decided that a starting place would be to make this unusually shaped block into a useable shape so I have made it into a rectangle. Then I decided that I would sew the blocks together into larger chunks/groupings. So that is what I am doing now. I am not worrying about the outcome, because that has kept me stuck for too long. I am just starting and sewing a few blocks at a time in a way that will join them together, and not thinking any farther ahead than necessary. I am hoping that by working in this way I will actually finish this winter quilt in my lifetime!

Saturday, November 04, 2006

Fabric Painting Class

Last month I taught a fabric painting class and today the students returned with their paintings - dried, heat set, and ready to quilt. They did a fantastic job learning how to work with the Setacolor paints and over the past month they have experimented with the techniques. Today we spent the first part of the class looking at the paintings, soaking up the creativity and learning new ideas from their work.
The painting on the left was made by Cathy. The class decided that it looked like a Monet painting. She is thinking about making it into a water scene. It was heavily salted when wet, which gives it the mottled texture.
The painting to the right was made by another Kathy in the class. She made some beautiful sun prints using leaves and this one has great movement. We were amazed that she found a day over the past month which had both sunlight and no wind!!
Ruth created this blue painting (on the left) using water softener salt. I haven't used this kind of salt before and she got some great effects with it. Does anyone else see a tree that wants to be quilted in this painting? Ruth also made some creative sunprints using coins and jewelry!

The painting on the right was made by Danielle. This photo is deceiving because it is actually a large painting, with brighter colours than you see on the screen...I'm still learning how to use this camera properly! I'll try to get a better photo next class.

The painting on the left was made by Gerry and it is also a sun print, using leaves from her yard. She told us that many of the leaves blew away and had to be repositioned, but it
turned out great!

This painting on the right was made by Geraldine and she spent lots of time overpainting some of her pieces. This piece has several unique treatments in drying and painting.

This piece on the left was made by Sheila, who has experience with fabric dyeing and she tried some interesting techniques to make this landscape, including the use of Saran Wrap, and shaving cream!

As you can see the students are very creative and each are developing their own style. Next month we will meet again to further work on turning their paintings into quilts.

Sunday, October 29, 2006

Fun With Quilting Threads

It has been a cold and wintery weekend here...perfect quilting weather! I have been quilting my "tessellating stars" quilt that I made in a class with Cindy Thury Smith last fall. It was a fun quilt to piece and has been fun to quilt. It is just the kind of quilt I like to make...scrappy with lots of bright colours. When I am machine quilting, I like to change thread colours frequently.Here is a photo of auditioning threads for the swirly design that I quilted in each star. In this quilt there are 18 full stars (each made from a different fabric) and 14 partial stars (there were some fabrics repeated on the edges), so that could potentially be 32 thread changes! Some quilters find it frustrating to have frequent thread changes, but I enjoy it.
Back to finish the quilting...I'll post a photo of the finished quilt when the binding is on...I'm using a lime green and yellow striped fabric for the binding!

Thursday, October 26, 2006

Miniature Quilt Class


I taught a day long class today at Reichard's Quilt Store on how to use EQ5 to print out quilt patterns, and how to use wax paper as a foundation to piece arcs like the ones in this class sample. This miniature quilt was made for my guild's quilt show challenge this year. We were given two pieces of fabric and the theme of "celebration" - this was my entry called "Celebrating Beauty and the Beads". I had to abandon my original design idea when I realized it would be too large for the miniature category (even though the blocks are 2 1/2") and I eventually settled on this design. It won first prize for pieced miniature quilts and second prize for use of embellishments.

My class today included a pair of friends (a new quilter from Pennsylvania who was visiting her Canadian friend and decided to take a quilting class together), a mother-daughter pair, some very talented quilters that I haven't met before and an old quilting friend that I was very happy to see again! The students in the class worked really hard and did a great job on their blocks!