Pages

Sunday, November 26, 2006

Christmas Decorations

Don't you just love getting your decorations out of storage? This weekend we had a family get-together so we decided to help Mom and Dad decorate their Christmas tree. This is the angel that has overseen every family Christmas for the last 47 years! Everyone would tell you that she is one of my Dad's favorite possessions! No one is allowed to touch the angel, and she is lovingly placed at the top of the tree every year by Mom or Dad. The grandchildren helped place all the other ornaments, and we found some of the ornaments I have made in previous years. In fact, there was an old felt drum that I made in grade 6 ("throw that ridiculous thing in the garbage" I say to Mom every year, but she still put it on the tree again this year), and here is one of the quilted ornaments I made 10 years ago for everyone in my family. It is a tradition now that I make something each year for all my neices and nephews...I still haven't decided on what to make this year...and now I have less than a month to figure it out!
After helping to decorate Mom and Dad's tree, I came home and started to dig out some of my old Christmas mini quilts to hang up. This is one of my favorites...it is about 8" square and was a fun project. I remember how much I enjoyed couching the garland on the quilted trees I made that year! If I were going to make these again, I would add many more ornaments to the tree and lots of beads! Oh...and I'd make sure the floor piece was not so wobbly!
You can find the full size block pattern here at Quiltaholics.
Tuesday, November 21, 2006

Monthly Miniature Class


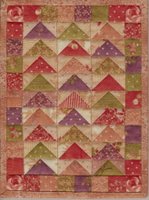
Today I taught a miniature quiltmaking class and this was the project for November. It is a very small (approx. 7" x 9") paper pieced quilt which I call "Flocks of Geese". I made the entire quilt using one of the Moda Swatch packs (excluding the binding). One of my favorite tips (which I learned from a Carol Doak book) is to use the Scotch brand "Magic Removable Tape" if you should happen to cut your pattern by accident. You can sew through the tape, and when your quilt top is pieced, the tape easily peels off from the paper.

Here is the pumpkin patch that the class pieced in October ...mini "Jack-o-Lanterns". The top three were made by Barb, the middle larger quilts were made by Lana, the bottom left quilt is Marj's and the bottom right quilt is Marion's. They all have the same centre pumpkin block, which measures 5" x 6" and then each quilter created different borders.
Check out my blog next month to see their finished "Flocks of Geese" quilts! Each student brought such beautiful fabrics in a variety of colours, so I am excited to see how they turn out!

Monday, November 20, 2006

Trip to Frankenmuth

This past weekend I went on a mini vacation with my sisters and my Mom. For the past few years we have spent our November weekend getaway in Stratford, spending Saturday night at "The Quilt" auction, but the admission price has doubled and it would've cost us $200 just to get in , so this year we decided to go somewhere new.
We chose Frankenmuth, Michigan and had a wonderful time together. We spent some time shopping, but mostly we visited and laughed, and talked until the wee hours of the morning. We don't see each other very often since my sister moved to the US, so we had a lot of time to make up for! I had a great time with my "womenfolk", but didn't get nearly enough sleep for all the driving I had to do!
One of the great stores we found is called "Bead Haven". No one else in my family is interested in quilting or beading, so I thought I wouldn't be able to spend much time in the store. But my youngest sister fell in love with the idea of a bracelet of her children's names, and spent even longer than I did in the store! Here is Mom and my sisters selecting some of the stones and beads for the bracelet, right before I got in trouble from the staff for taking photos in the store....oops! Anyway, I purchased some beautiful beads for a project I am working on, and if I had an unlimited budget, I could've spent a big pile of money there! They have three large rooms filled with an incredible variety of beads. They also offer classes, in a lovely classroom setting with large well-lit tables. For the people who don't love bead shopping and have to wait for the shoppers, they have a sitting area with large comfy chairs. My sister was very happy with the beautiful bracelet she made for her birthday...a little gift from herself, to herself, and a momento of our girls weekend together!
The staff did allow me to take this photo (on the left) of a sparkling quartz that was just remarkable...it was probably about 12" across the base and 10" high. And here is a photo of us outside the store...it was cold and windy in Michigan. Can you see my sister's bracelet?!?!?

Wednesday, November 15, 2006

Guild Meeting

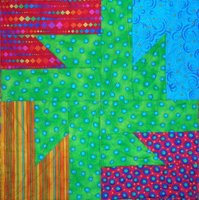
I had too many things to remember for the guild meeting last night! I had myself all stressed out trying to get organized. I had to put out the historical records (I am the guild photographer/historian) which meant putting the finishing touches on last year's album, and the quilt show album. And I wanted to show two quilts at "Show and Share" so the bindings had to be finished. This is a quilt for one of my energetic nephews. The pattern is called "Tesselating Stars" and is by Cindy Thury Smith. It took quite a while to finish (okay...it was just over a year, which is not long by my UFO standards!!) and it was a real learning experience in terms of color planning. I enjoyed the block construction, but it took many trips back and forth between the design wall and the sewing machine. I had a great time with the machine quilting and made a fun design in the middle of each star....I don't know if you can see the quilting on this close up shot of one of the blocks or not? The binding is one of my favorite fabrics....a bright and happy yellow and green stripe. And the best news is that Cindy (the pattern designer) has generously given me permission to teach a "Tesselating Stars" class this winter!
The second quilt is one of Debby Kaffunger's designs called "Diamond Waterfall". I was originally sewing it for a charity quilt, but my daughter loved it so much that I made it larger, and then I had to spend way too much time shopping for more fabric to finish it! However, I was successful in finding more fabric to match and it is finished now, in plenty of time for Christmas. I had trouble initially choosing my quilting designs and still haven't quilted anything in the pink areas. I haven't decided if it is finished yet or not, however the binding is on now, so I'm guessing it's done! (I have written more about these two quilts in October postings)
So between lugging the two large photo albums, these two quilts, my library books to return, my finished blocks of the month for charity quilts, and my camera equipment...I was loaded down. And guess what I forgot? My nametag! Why can't I just keep it in a place where I will always take it along?!?!?


Sunday, November 12, 2006

Progress on my Winter Quilt

For the past 3 years I have been working on a winter quilt for my dining room wall. I already have a Christmas wallhanging and a spring looking quilt, plus my Great Canadian Fall quilt which is hanging there today. This quilt was made from a row round robin with Canadian quilters I met on the internet, and is about 55" square. I finally quilted it last fall but am seeing spaces that could use a little more quilting every time I look at it!

I have been collecting blocks for my winter quilt which I would hang up in January (if it was done!) for 4 years now. I have received many wonderful blue and white blocks in these exchanges in which I have participated. I have accumulated more than 30 blocks for this quilt, but the problem is that they are all different sizes and shapes and I cannot for the life of me figure out how to put them all together in one quilt! I have played around with EQ5 and designed several quilts and am not happy with anything so far. Finally I admitted to myself that if I continue on in this manner, the quilt will never be finished. So I just have to start somewhere and stop thinking about it. I decided that a starting place would be to make this unusually shaped block into a useable shape so I have made it into a rectangle. Then I decided that I would sew the blocks together into larger chunks/groupings. So that is what I am doing now. I am not worrying about the outcome, because that has kept me stuck for too long. I am just starting and sewing a few blocks at a time in a way that will join them together, and not thinking any farther ahead than necessary. I am hoping that by working in this way I will actually finish this winter quilt in my lifetime!

Saturday, November 04, 2006

Fabric Painting Class

Last month I taught a fabric painting class and today the students returned with their paintings - dried, heat set, and ready to quilt. They did a fantastic job learning how to work with the Setacolor paints and over the past month they have experimented with the techniques. Today we spent the first part of the class looking at the paintings, soaking up the creativity and learning new ideas from their work.
The painting on the left was made by Cathy. The class decided that it looked like a Monet painting. She is thinking about making it into a water scene. It was heavily salted when wet, which gives it the mottled texture.
The painting to the right was made by another Kathy in the class. She made some beautiful sun prints using leaves and this one has great movement. We were amazed that she found a day over the past month which had both sunlight and no wind!!
Ruth created this blue painting (on the left) using water softener salt. I haven't used this kind of salt before and she got some great effects with it. Does anyone else see a tree that wants to be quilted in this painting? Ruth also made some creative sunprints using coins and jewelry!

The painting on the right was made by Danielle. This photo is deceiving because it is actually a large painting, with brighter colours than you see on the screen...I'm still learning how to use this camera properly! I'll try to get a better photo next class.

The painting on the left was made by Gerry and it is also a sun print, using leaves from her yard. She told us that many of the leaves blew away and had to be repositioned, but it
turned out great!

This painting on the right was made by Geraldine and she spent lots of time overpainting some of her pieces. This piece has several unique treatments in drying and painting.

This piece on the left was made by Sheila, who has experience with fabric dyeing and she tried some interesting techniques to make this landscape, including the use of Saran Wrap, and shaving cream!

As you can see the students are very creative and each are developing their own style. Next month we will meet again to further work on turning their paintings into quilts.